The Planner module is a powerful addition to the GreatSoft Practice Management (PM) software suite. It combines flexibility with your PM setup to offer an interactive planning and budgeting platform that could become one of thé Go To pages of all your staff for making plans happen.
Planner was designing and developed for easy adoption and use by everyone. Existing GreatSoft users will find the capturing of detailed Project Jobs familiar to Timesheets. The current version doesn’t require much administrator setup and it is done by GreatSoft consultants.
This GreatSoft PM Planner process overview primarily aims at assisting users to get started with using the application.
Due to the extent of this document, use Ctrl + F to find any information you need.
Related process guides
User Login & Profile Settings: This process guide offers information with regards to logging into the GreatSoft PM software to ensure a continued safe online experience. It also gives guidance on how to customise some areas of the PM interface to personal preference, by setting up your profile when logged into PM.
Navigating & Customising the Dashboard: This process guide offers an essential Overview of navigating through the GreatSoft PM software to help users understand the user interface and fully benefit from the system in an efficient manner.
Grid & Widget style capturing of timesheets: This process guide aims at enabling you to create, capture and submit a timesheet for approval by your assigned approver in the GreatSoft Practice Management (PM) software.
Calendar style capturing of time & expenses: This process guide offers an alternative method for capturing timesheets and disbursements, in addition to the grid format and the quick timesheet widget tool.
Administrator: Standard tasks maintenance & client tasks: This process guide aims at enabling administrators and/or users to create and maintain standard tasks, to add them to Clients, and to customise/set up Client Tasks in order to capture chargeable Timesheets and Disbursements, representative of the work done for your clients, and to subsequently generate the applicable WIP reports and to raise the relevant Fees.
Getting started
Licensing
Firms require an additional license from GreatSoft for Planner to be activated.
Employee security
Security Token
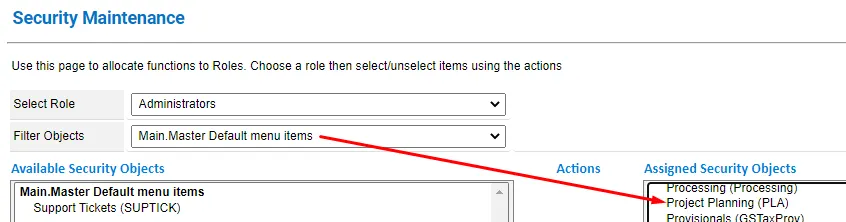
The firm’s administrator needs to assign the Project Planning (PLA) Security token to the applicable User Role(s) for this functionality to become available from the Application Navigation Menu.

Project Board Security
User access and rights to Projects are controlled via Project Boards.
Each Project belongs to a Board. The Project Board Collaborator is responsible for assigning different levels of security to individual Employees or groups of Employees per board and hence to the Projects and Project Jobs that are part of each board.
System setup/maintenance
The GreatSoft Consultant will do the necessary setup during implementation.
Contact our Support Team for any further assistance as needed.
Accessing planner
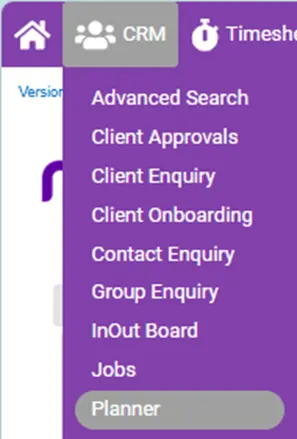
Access Planner from any location in MYOB PM, by hovering across the
CRM menu to the left of the Menu bar.
Click on Planner to launch the page.

Planner menu overview
This section briefly introduces each menu item to familiarise you with the system. They are discussed in detail within context across the different sections, as applicable.
Initially, when the Planner tool has been newly implemented for your firm and no Project Board has been created yet, you’re presented with an almost blank screen when opening the application. The Menu System is across the top of the page.
If you wish go back to the classic look of the old planner, you can do so using the OLD PLANNER button on the top right of the page.
Your firm would start off using Planner by creating the first Project Board(s). This is typically done by a Head of a Department/Partner, or Manager, but any user could create his/her own Board to manage.


Note: To explain the hierarchy of key terms used in Planner, you would have an overall Project Board (e.g. per Department, or per Department per Partner), in which you would have various related Projects (e.g. Tax Projects for all your clients, or Tax Projects for all clients per Partner), with the detailed breakdown and allocation of resources per Project through its Project Jobs.
The Planner Menu accommodates various levels of searching for/displaying an existing Board and/or Projects and Jobs by name and/or by custom filters.
Functionalities for creating/adding new Projects, Projects Jobs and Ad-Hoc Jobs can be accessed from the ADD menu. Alternatively, most of these functionalities can be accessed from existing Projects and Jobs to accommodate for different user preferences.
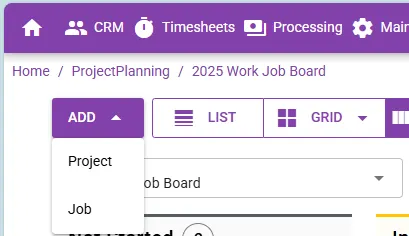
The menu offers several data view preferences.
To display/access the content of a menu item, hover over the button.
The Project Boards drop-down menu is for creating, selecting and managing Project Boards.

Any user can create his/her own Project Board(s), but your firm’s different department heads would typically create and manage the necessary custom Boards to segregate planning in the firm.
The originator is the Board Owner, who will then add other users with the necessary security rights.
The Collaborator user role has the rights for creating and setting up/managing boards, e.g., create and update Projects and Project Jobs.
Projects are added/created by a collaborator while inside the selected Board.
Users can switch between the different boards, and hence the Projects and Project Jobs to which they have been given access by the board owner.


Board menu features
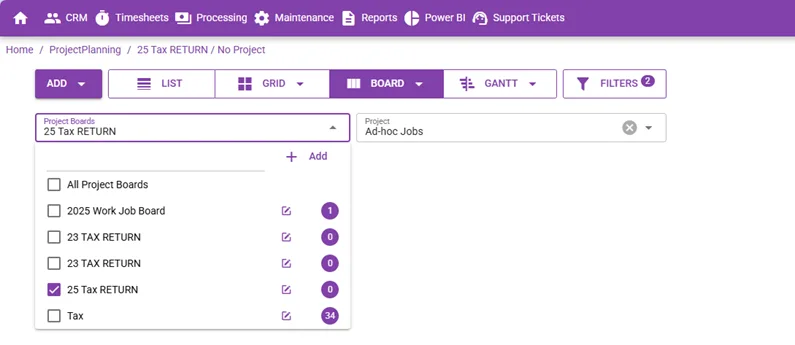
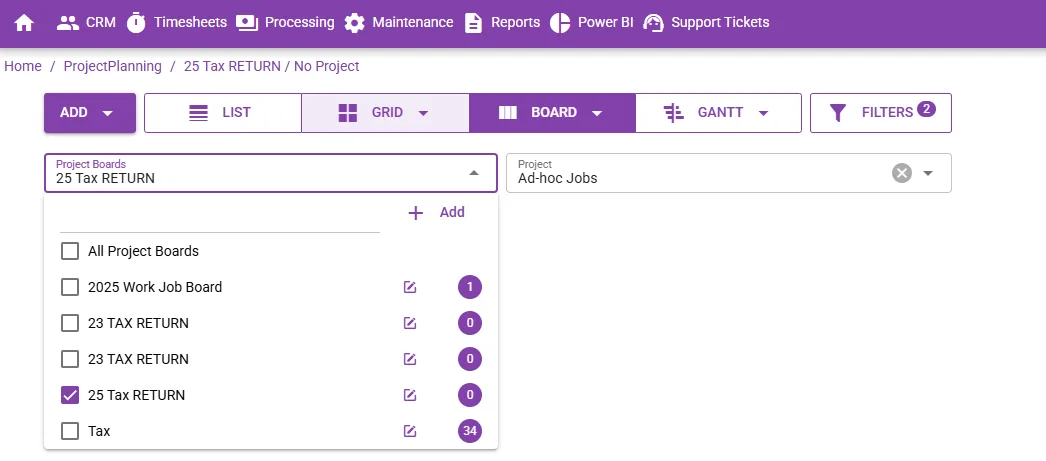
To see which board is currently open, or if you wish to select another existing project board, or to create a new board, click on the Project Boards drop-down menu.
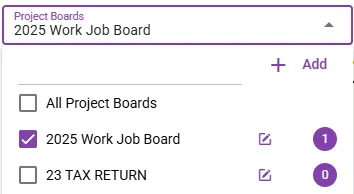
The name of the Board that is currently open shows at the top.
If the list of Boards to which you have access is long, capture search characters in the textbox to help locate and select the specific board.
To add a new Board, click on the plus + button near the top of the menu.
To open another existing Project Board, select the applicable Board Name from the list.
To edit/customise a Project Board, click on edit button next to the name of each board.
The circled numbers indicate the number of Projects in each Board.
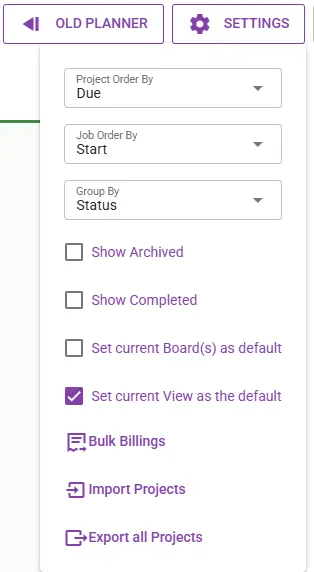
You can select the desired Project Board and set it as the default, by then enabling Set current View as the default under the Settings menu.


Project (add, search, edit, select)
The next menu item is for finding and managing projects on the currently selected project board.

The name of the Project(s) that is currently available for access is displayed in the project list.
The default is to display all projects.
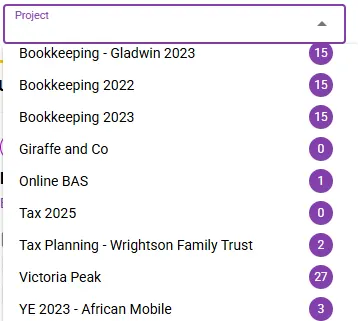
To only display a single Project on the Project List, select the desired from the list.
When an individual Project had been selected, its name shows in the Project drop-down menu.

Only that single Project is now available for access on the main Planner page.
If the list of Projects to which you have access is long, capture search characters in the text box to help locate and select the project.
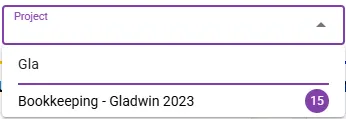
The circled numbers indicate the number of existing jobs in each project.
The Ad-Hoc Jobs folder is also available.
This is not a Project per se, but only a folder for e.g., capturing personal daily reminders.
When All Projects are chosen, the Ad-Hoc Jobs folder is also available on the page.



Add project/Add job
Add project
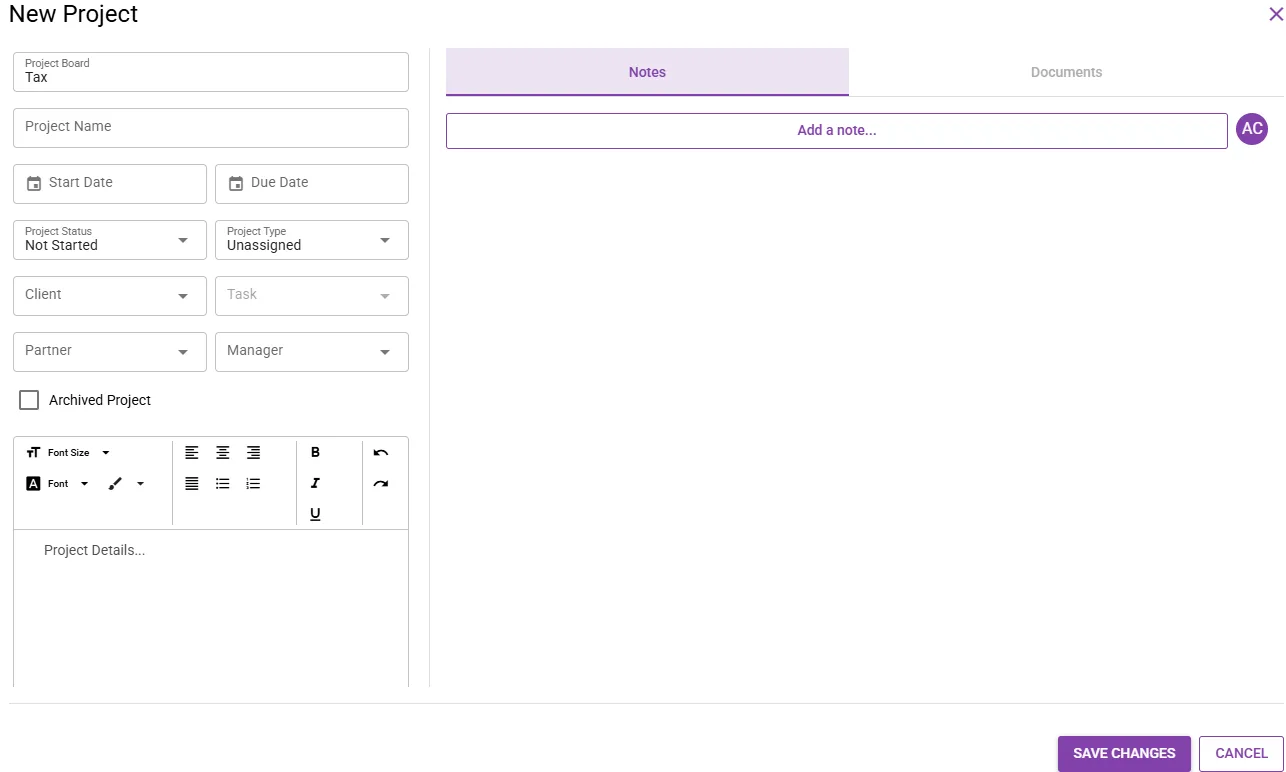
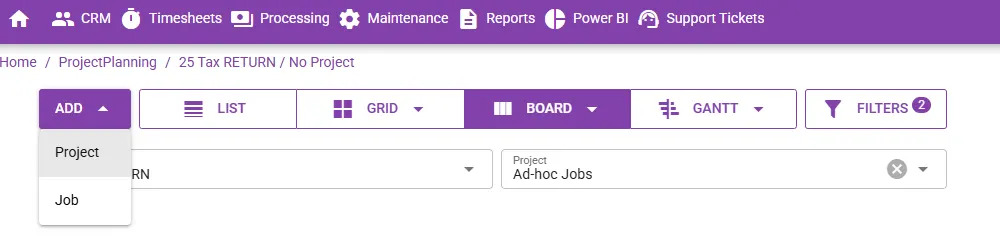
Start a new overall Project by going to the ADD menu and selecting Project from the displayed options.
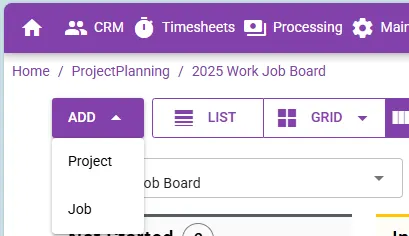
Capturing and saving the new Project results in the empty Project plan with at least the Start and End Date that you can update with the detailed budgeting information by adding Jobs per Category and Activity.


Add job (add dd-hoc job)
The Add Job menu item opens the Ad-Hoc Jobs capture screen for capturing your daily to-do tasks/reminders that aren't part of a formal project.
Alternatively, as for projects, ad-hoc jobs can be captured in a line format directly underneath the expanded ad-hoc jobs folder.
Note: The principles for adding and setting up Ad-Hoc Jobs are similar to adding Project Jobs.

Filters
Filters are used to manage large datasets.
You can apply a single filter or combine multiple filters to return a desired project list.
The available filters for filtering out a firm’s projects include.
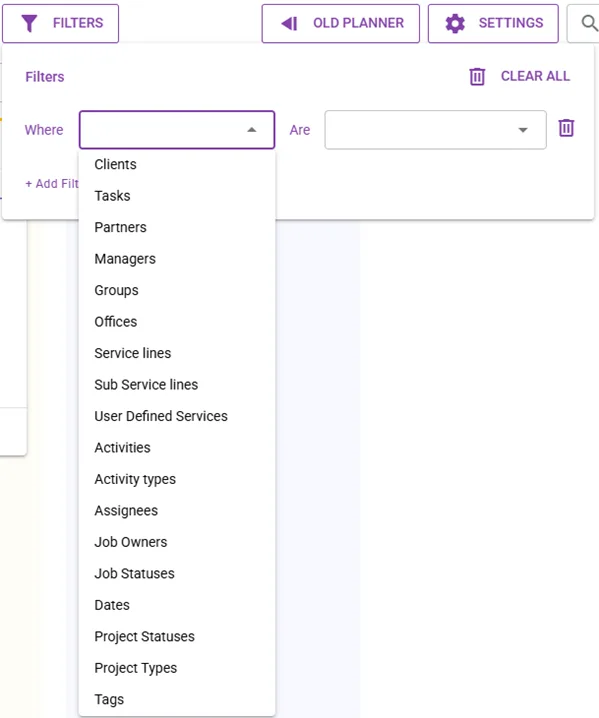
The currently applied filters display in the FILTERS drop-down menu.
To remove individual filters, simply click on the Bin button next to the filter.
To remove all applied filters at once, select CLEAR ALL button on the right.
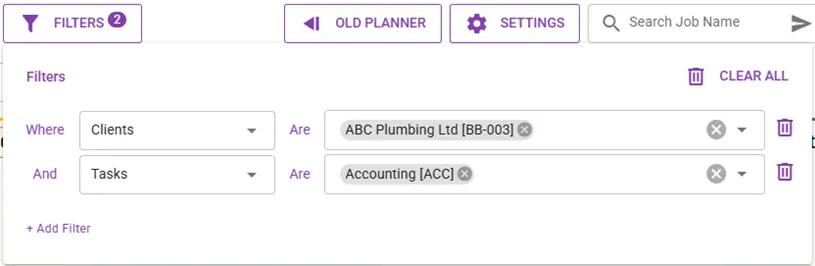
Examples of a firm’s Service Lines and Activities filters.
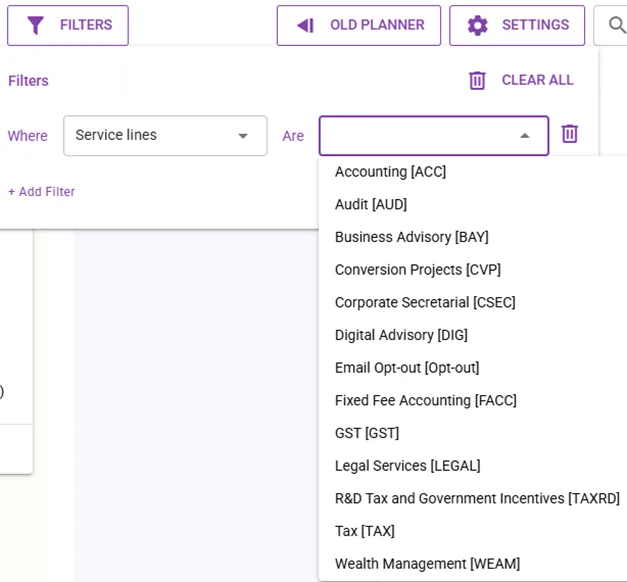
Examples of a firm’s set up Job Statuses and Project Statuses filters.
Note: The available statuses pull through from what has been set up on the current open board. If nothing has been set up, none will be available to select from.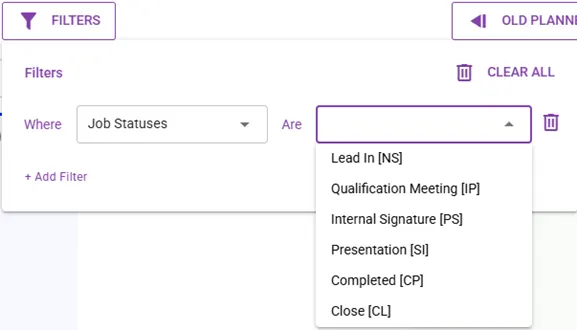
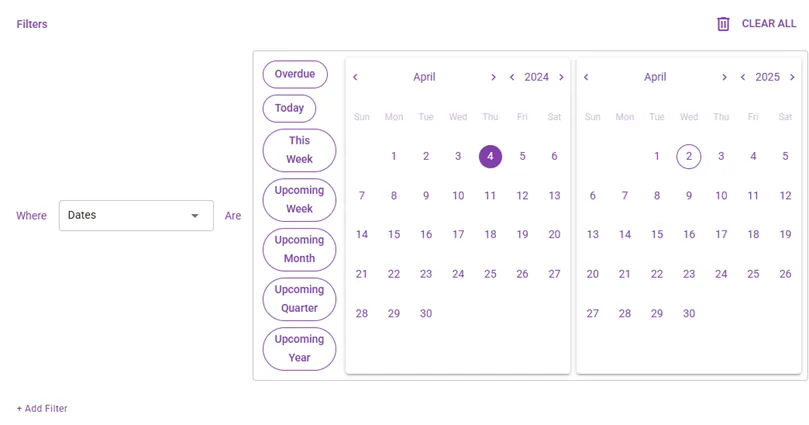
If, for example, you wish to view projects for a specific date range in your planning for the year ahead, you can manually select both the Start and Due Dates on the calendar.
The filters will populate and show at the top of the project list and filter for the relevant projects and jobs on the current open project board.
Alternatively, 7 time-based filters (including Today, the Upcoming Week, Upcoming Month, or for the Upcoming Year) can be selected that will auto-populate the Dates on the calendar and on the filters at the top.
While active, the selected filter is highlighted.
You can manually override the start and/or due date on the calendar, which, if valid the start date is on/or before the due date or the due date is on/or after the start date, the time-based filter will not be highlighted anymore and the filters at the top of the project list will update accordingly.


Clear filters
Refer to above filters section.
The CLEAR ALL option drops all applied filters at once and defaults to display all projects.
Alternatively, to remove individual filters, click on the Bin button next to each filter.
Views
There are 4 types of project and/or job views accommodate different user view preferences, including:
List view (depending on user preference, users will probably work mostly in this view).
Grid views.
Board view.
Gantt views.


Personal settings
This section allows for some user preference settings of the Planner module.

Show Archived
When this option is enabled, archived (completed and terminated/deleted) Projects will also display on the list of Projects.
Show Completed
The Show Completed options in the Setting menu can be used to include/exclude completed projects from the project list.
You can sign off a project as completed, or if you wish to delete a project, you need to archive it.
You cannot delete a complete project due to the risk of losing all info by mistake.
Set current boards as default
When this option is enabled, the current select boards will launch again by default, when you open Planner the next time.
Set current view as the default
You can set up and save your preference filters and view (List, board, grid or gantt views), by enabling the Set this as default view setting.
When this option is enabled, your last personalised settings when you leave/close the system will launch again by default, when you open Planner the next time.
Working in Planner
Creating a new project board in Planner
A Project Board is a folder in which you add/group related Projects together, such as per activity, task and department. A board could be for audits or for accounting work for a financial year per partner, for example.
Create the first project board by clicking on the project boards to display the lookup and click on + Add.
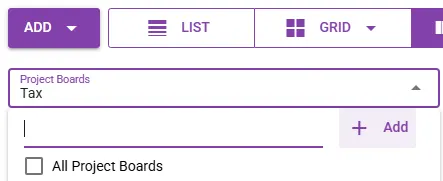
On the new empty Project Board that pops up, first enter its Name.

To continue, either press Enter on the keyboard, or click on the SAVE CHANGES button.
Alternatively, to exit the window and abort creating the board, either click the x in the top-right corner, or click CANCEL down below.
After having successfully created the new board, its detail settings become available.
The Board Name and the Board Owner (the employee who created the board) display at the top-left of the window, respectively.
You could set up all or some of the board details now, or you could click Save to close it and set it up/edit it later.
Once your firm’s firm’s first Board is created, each logged in user’s default
Ad-Hoc Jobs Project folder becomes available on the Planner tool’s main Project List page.
The Ad-Hoc Jobs folder is used to capture and keep track of your personal daily to-do tasks/reminders that aren't part of any formal project, e.g. meetings, training, filing, contact a client or to pay the bills, etc.
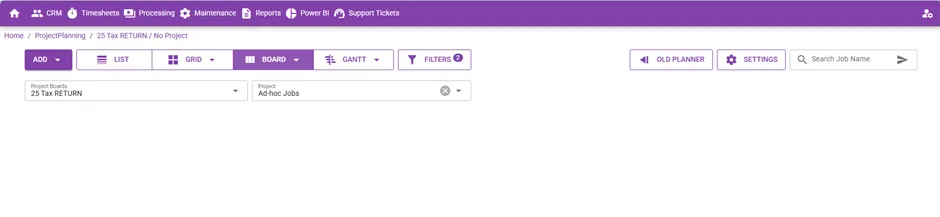
All existing boards would be listed below the Search field (currently only the one board exists in the system).


Setting up/editing an existing project board
Hover over the first menu button to display the list of existing boards.
Click on the Edit button of the Board you wish to edit and set up.
The circled number to the right of the Edit button represents the number of existing projects for the board.
The detailed Board screen that opens up has the following features.
Board Name. The name can be edited by the board owner or any assigned collaborator by clicking it and changing it as needed.
Board Owner/Creator. The board owner automatically has full security rights to set up and/or update everything on the board.
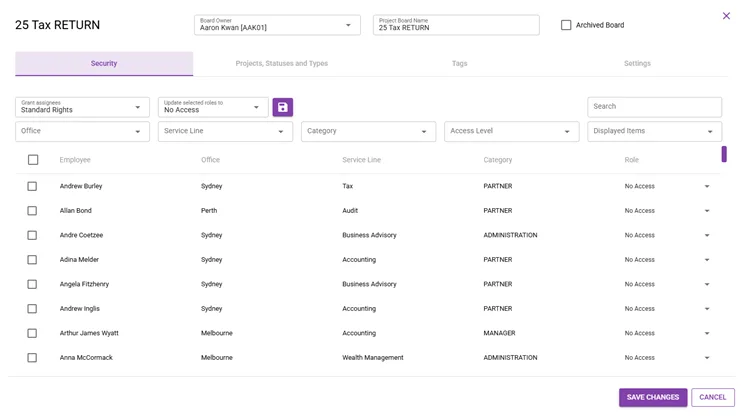
The Security tab is where Access Rights are given to relevant staff. Depending on the rights given, staff will be able or not to set up/edit info relating to certain areas.
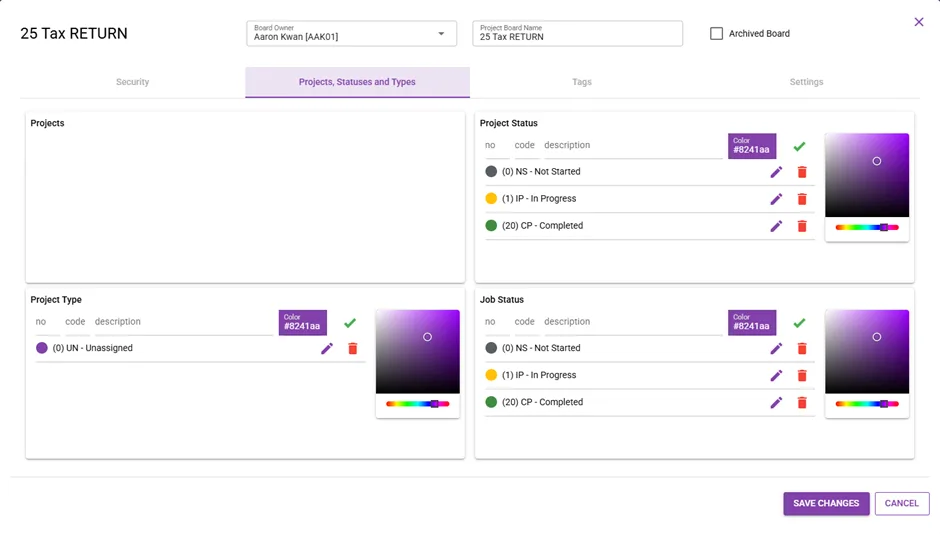
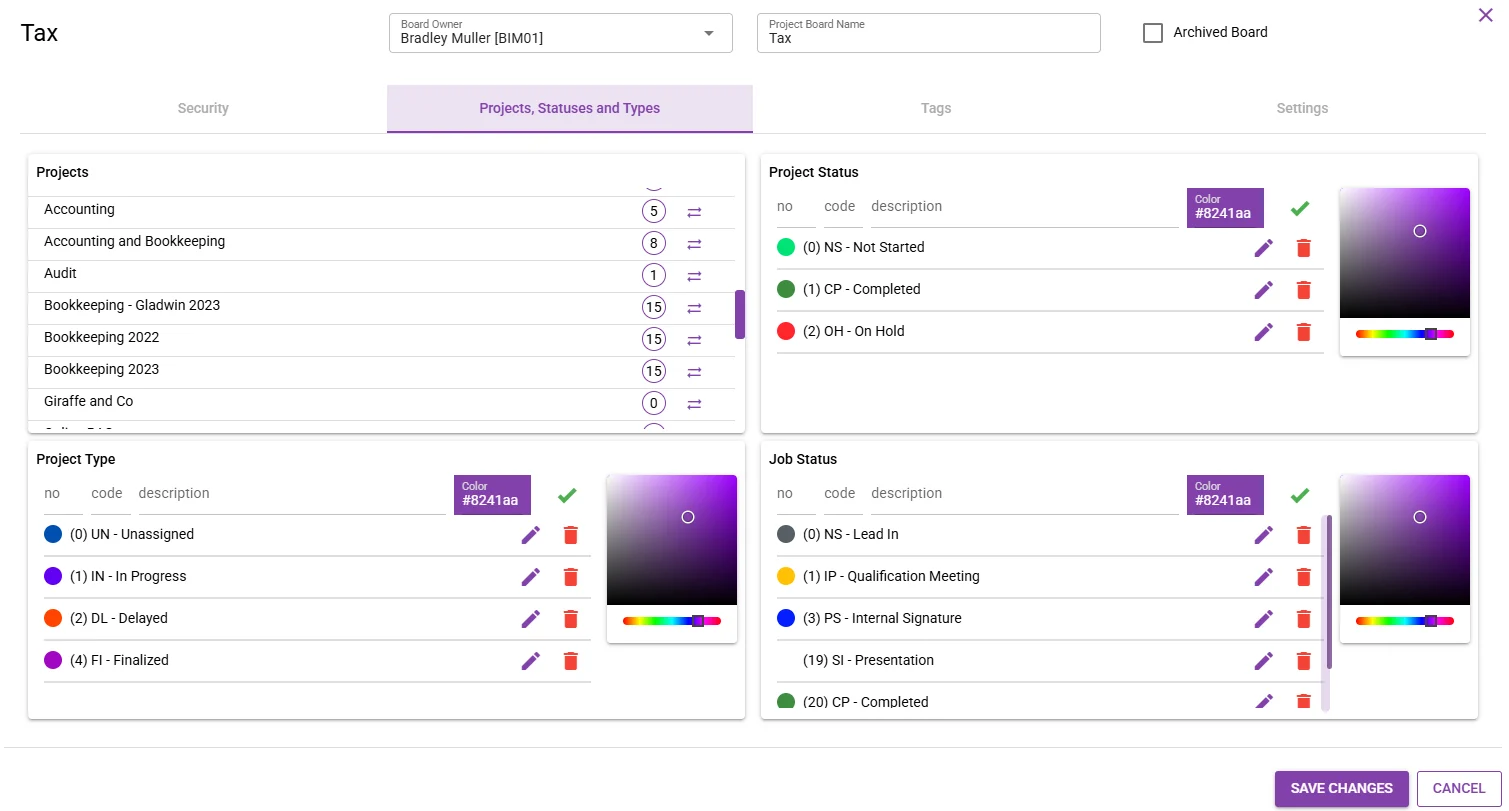
The Projects, Statuses and Types tab covers the following:
Section where Projects are listed as they’re added to the board.
Section where Project Statuses can be created and colour coded for display on the main Planner List. These become available as filters when this board is open.
Section where Project Types can be created and colour coded for display on the main Planner List. These become available as filters when this board is open.
Section where Job Statuses can be created and colour coded for display on the main Planner List. These become available as filters when this board is open.
Projects are split into relevant Jobs for achieving the objectives of the project.
SAVE CHANGES button. After having updated the board, click on the overall Save button to keep any changes made to the board.
CANCEL buttons. Alternatively, to exit the page without saving, click on either of the 2 x Close buttons (use with care to prevent losing changes unintentionally).

Employee security setup
User Security is controlled and set up from within each board by the Collaborator to allow for 4 levels of user access.
No Access.
Resource.
Guest: Only has rights to view the board.
Contributor: Restricted Rights: Change/adjust statuses and add info (Attachments/Notes).
Collaborator (admin rights): Has full rights, i.e., to change a board’s settings, create and update all projects and all project jobs that are part of that board.
Assigning employee security rights
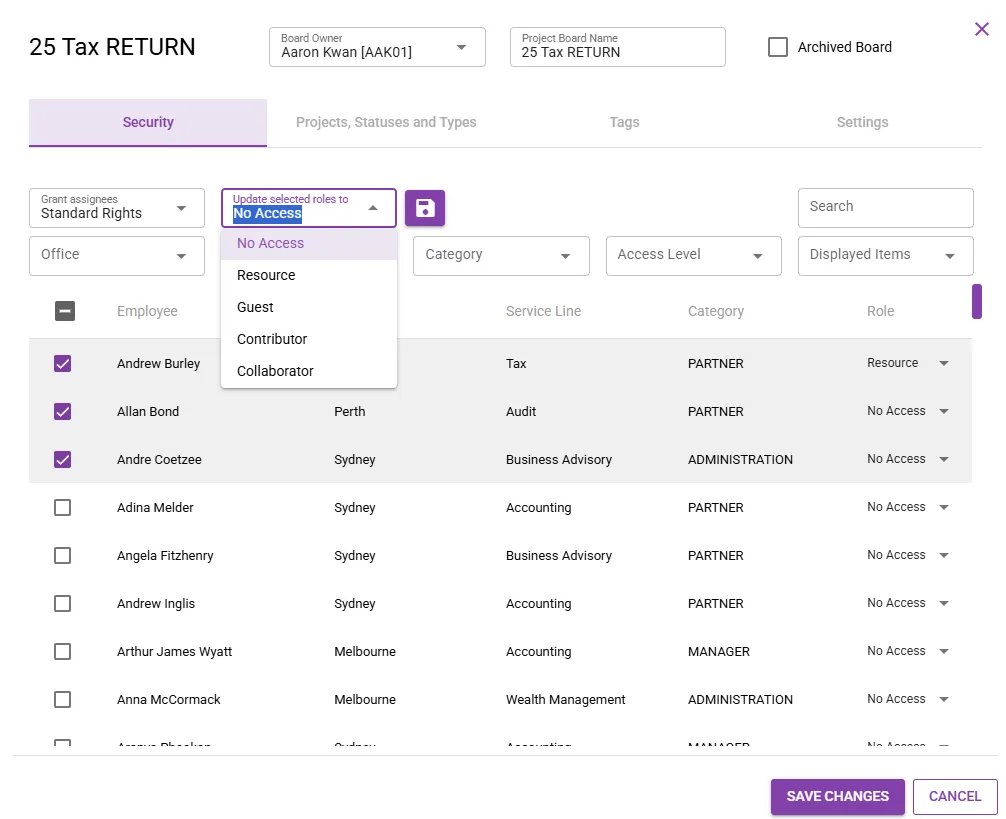
Display the desired employees, e.g., by selecting the applicable Display Items (Show All, Show added only, Hide added) and/or making the applicable filter selections and/or by typing search characters to locate an individual employee.
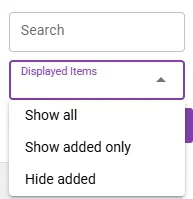
Note: The radio buttons Show All, Show/Hide added refer to employees that are being allocated/assigned to this board or not.
Select an individual or multiple employees (check individual checkboxes), or all employees (click on the All checkbox in the grid heading).
Select the applicable Access rights option from the Update selected Roles to lookup.
To assign all marked employees to the selected role, click on the Save button.
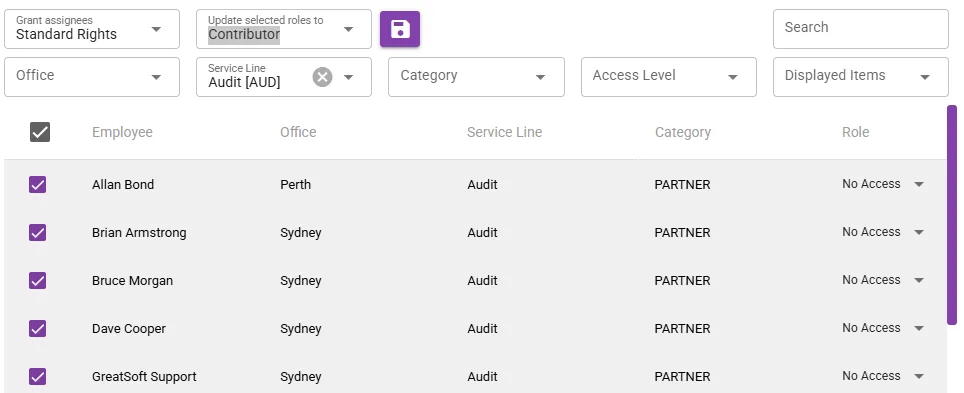
You can save time with the bulk utility, for example you can filter for auditors, select All and give the whole audit team contributor access with a single click.


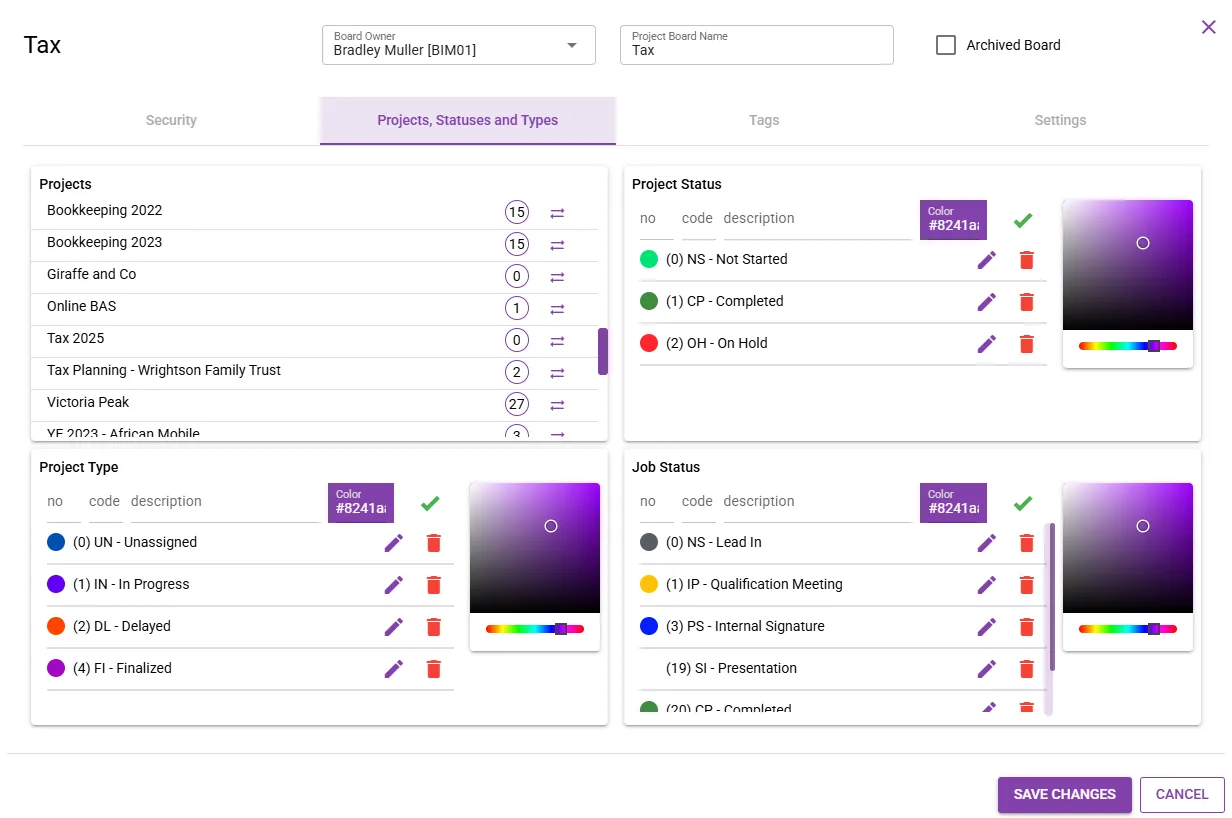
Customising project statuses and types
Each Project Board has its own set of colour coded custom Project and Job Statuses, as well as Project Types.
Only a Contributor is able to access the setup of a project board and to create the set of custom statuses.
Note: No projects have been added to this board yet, hence no items are listed in Project section.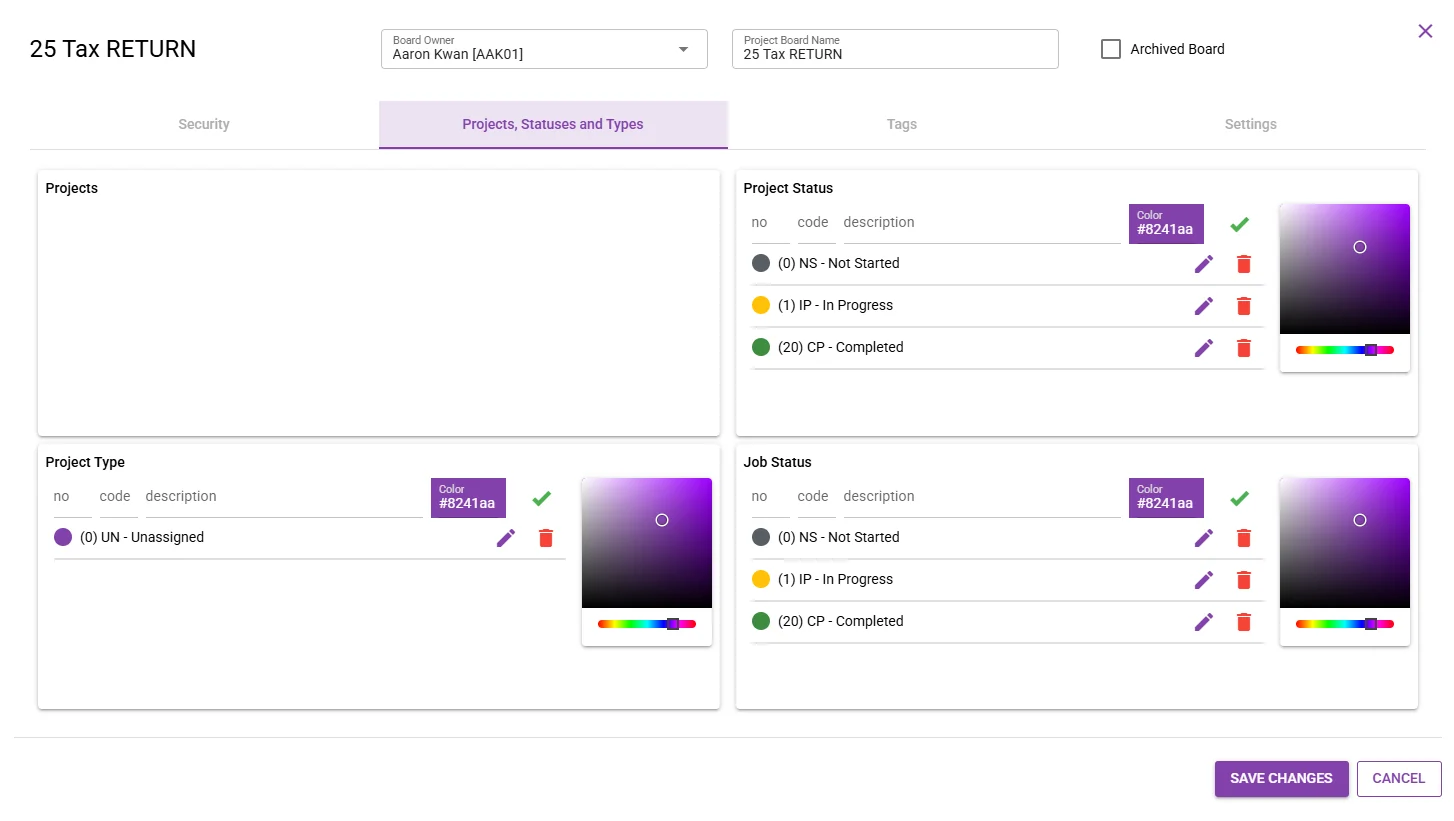
Example of list of projects.
Projects could have different Statuses, such as Not Started, In Progress, Postponed and Delayed, which display as little colour coded flags to the right hand side of each project header.
You could for example set up different coloured Types of Projects that show the Planner lists in colour coded line items.
On an expanded project, the custom Statuses for different Jobs could also show in the chosen colour codes as per the current job statuses.


How to set up custom statuses and types
Project and Job Statuses, and Project Types are all set up, using the same principles.
Project Statuses is used for illustration purposes.
To add a new Custom Project Status, capture the details in the New Status line (a) directly underneath the Project Statuses heading, i.e. the Number, Code and Status Name.
Either click the Tab key on the keyboard to move to the colour code field (b) to enter a hex colour manually, or click directly on the colour wheel and select the desired colour.
You can user the color bar below the color wheel to further customise and obtain the desired shade / intensity.
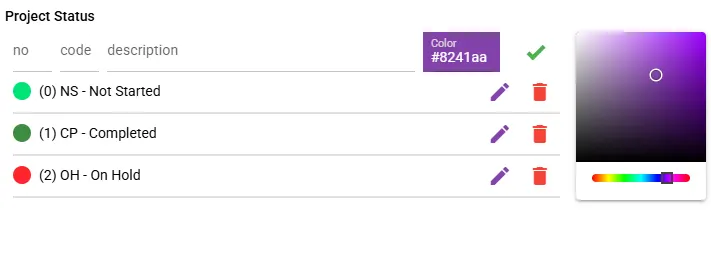
Click on the Save button to the right of the color field to Save the new custom Project Status.
The saved Status is added to the list.
To Edit or Delete any existing status, click on the relevant pencil / bin
button.
Below illustration demonstrates custom statuses and types for the selected project board.
Remember to save all changes to the board overall by clicking the green SAVE CHANGES button.


Creating a new project (adding a project to a project board)
Projects are added/created by collaborators while inside the selected board.
First ensure that you’re on the correct project board by checking the projects boards drop-down menu.
Choose the applicable board if its name doesn’t appear at the top.
Start a new Project by opening ADD menu and selecting Project menu item on the left.
This is the only route for starting a new project.
A New Project window opens for capturing the high-level project information (Project overview).
This screen initially has only a single pane.
Once the Project setup has been Saved, extra panes become available.
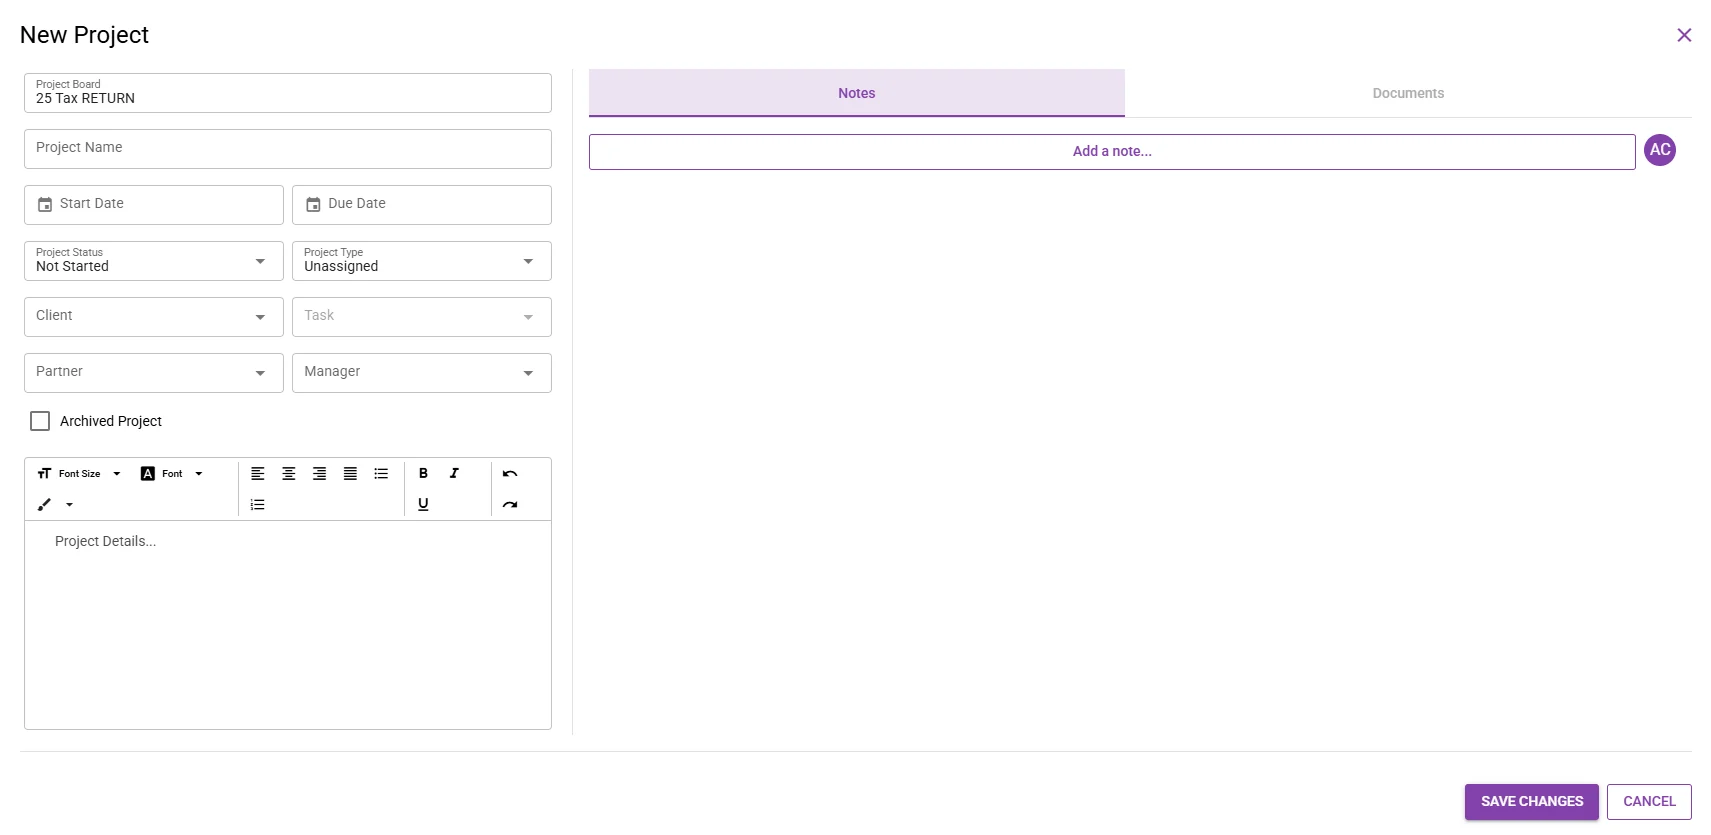
On the new empty Project window that pops up, first enter the Project Name.
If you now press Enter on the keyboard, or click on the SAVE CHANGES button before having completed any of the setup, you’ll be prompted in red to first select the project Start and Due Dates.
Specify the project Start and Due Dates from the calendars that show after clicking on the date fields.
Note: Currently, you cannot plan outside of the initially chosen Dates by making post-planning changes, such as timeline adjustments, or changes in the order that activities occur, or scope changes (adding activities that weren’t part of the initial plan to existing projects).
As a result, to allow for post-planning changes, the system currently
doesn't enforce project dates.
We'll address project date flexibility in a future version to permit post-planning changes, in order for revisions to be planned and accounted for in an existing project, while simultaneously enforcing the set project dates.
Capture any other overall project information that’s available.
Note: Almost all information in Planner (both Project and Job info) is optional for flexibility.
You could therefore Save a partly set up Project and update any missing information later, as it becomes available.
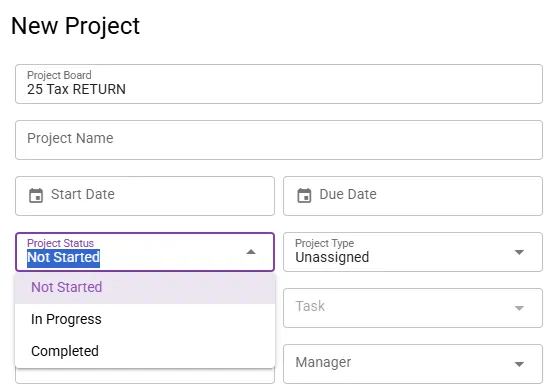
The Project Status and Project Type lookup lists pull through from those being set up on the relevant project board.
Select the Client(s) for the project.
You could have multiple clients within a project, e.g., if the project concerns a client group.
Currently, you'll need to add a line item for each client.
11. Choose the Task.
The Task lookup list accommodates both Client specific Tasks (active Tasks) and the firm’s Standard Tasks.
Currently, Standard Tasks make forward budgeting/planning possible. For example, while the 2021 audit is not yet open, you can plan towards it by planning on your firm’s Standard Tasks, until the relevant active Tasks becomes available to plan on.
12. Select the Partner and Manager for the Project from the displayed lookup lists.
If you’ve chosen an active Client Task, the Project Partner and Manager auto-populate straight away from that Task. You can change them, as applicable to the Project.
Contrary, if you’ve chosen a Standard Task, the Task Partner and/or the Task Manager must be manually assigned, or if they’re not yet known, these fields could be left for completion later.
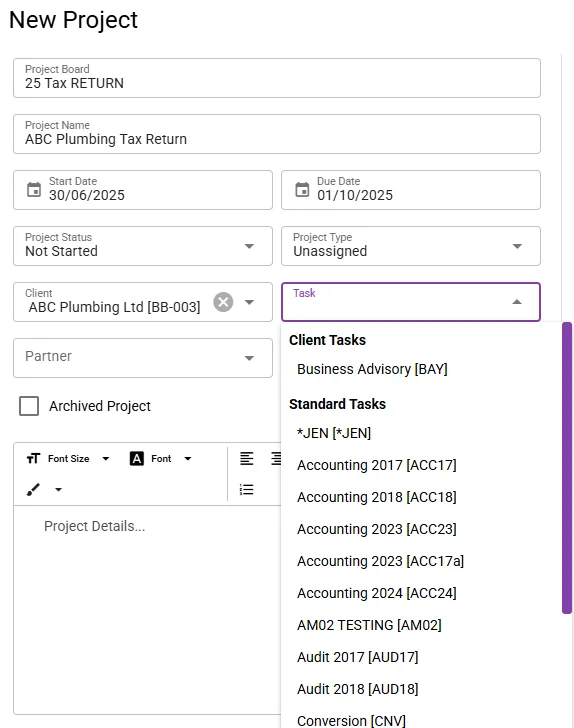
Save the overall project shell to keep the changes made by clicking on the green SAVE CHANGES button.
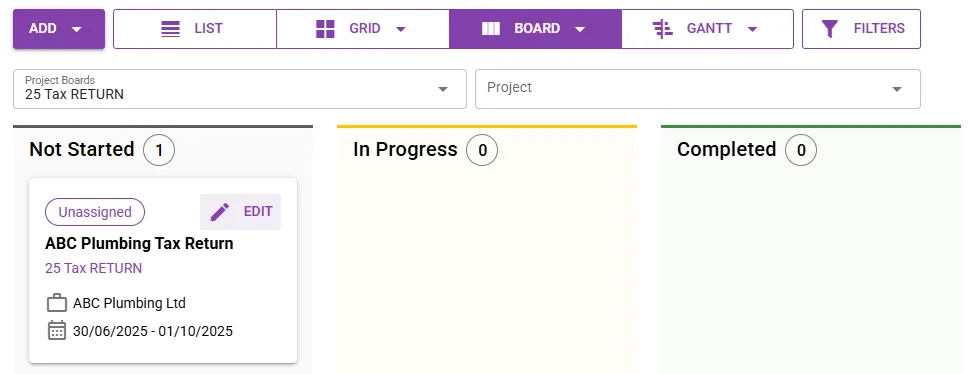
The project window closes upon saving and is added to the current project board in addition to the Ad-Hoc Jobs header that is always visible on any selected project board.
The project is also available on the projects menu item.
Example of a new empty project shell without any detailed jobs added to the main Project List page and Project menu lookup (circled Job counter = 0).


Viewing and/or editing an existing Project (Project overview)
To open the overall project for further setup and editing, click on the EDIT button in the project card.
Remember to Save any changes made to the Project setup by clicking on the green SAVE CHANGES button before exiting the window.
In addition to the setup section to the left, a number of other tabs are now available; including ones for adding Notes and for uploading project related documentation.
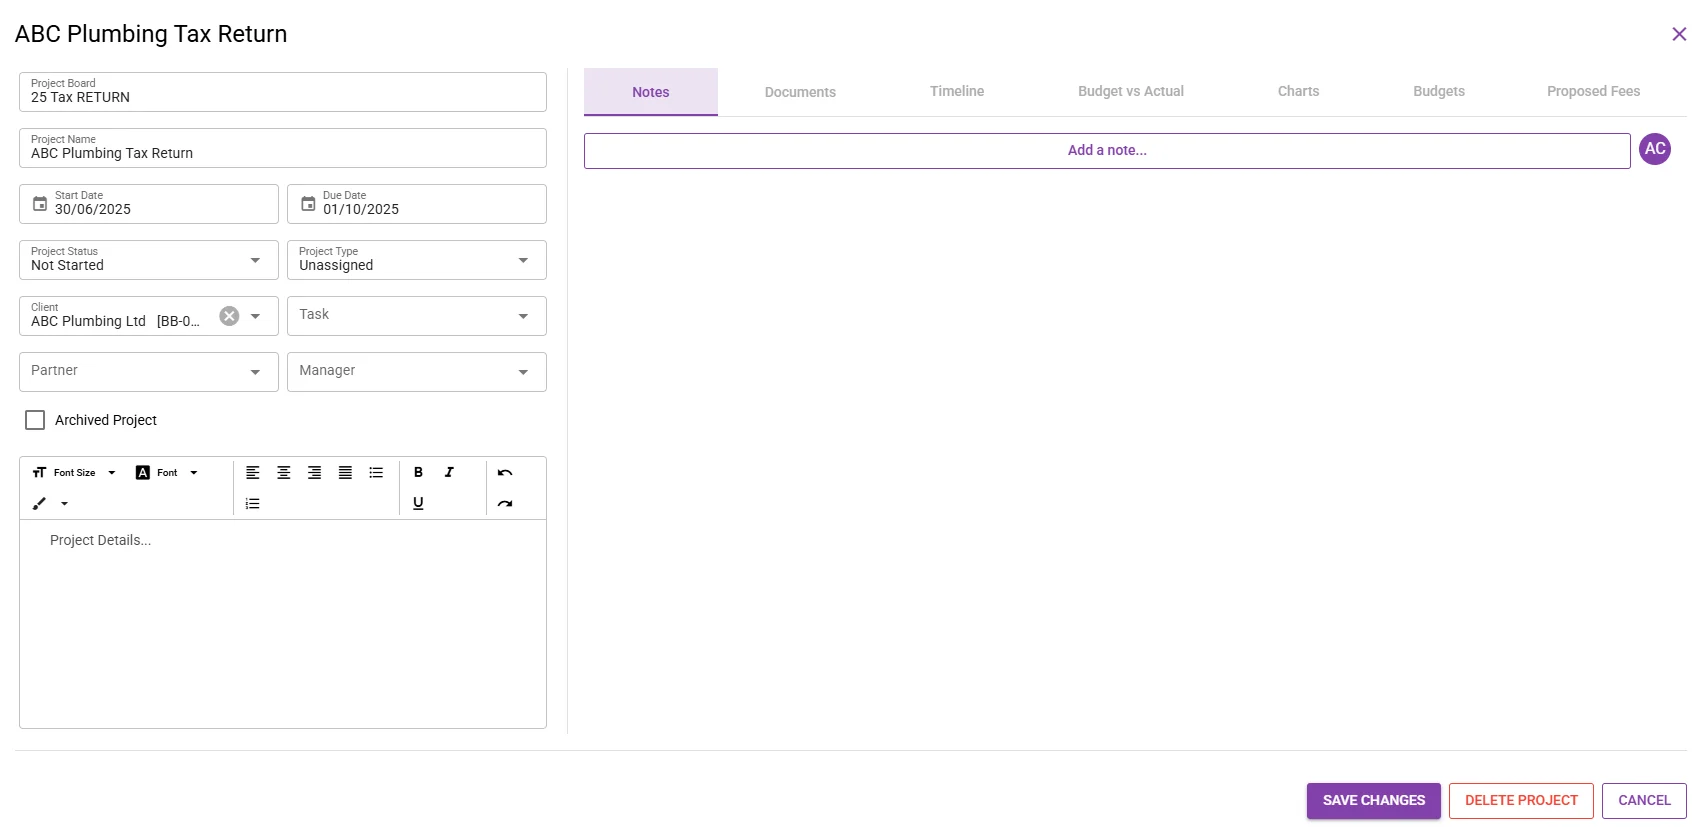
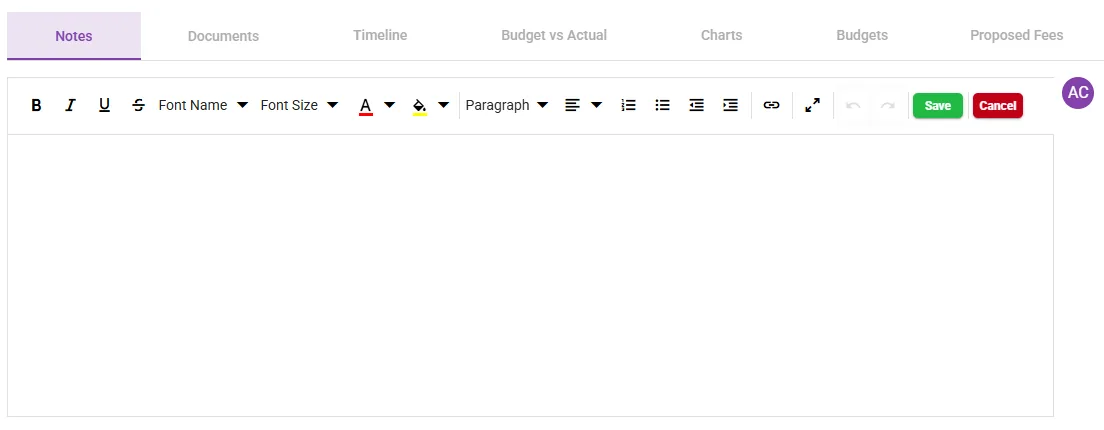
To add any Comments, click on the Add a note label and capture applicable Notes in the popup window
Click on the green button to Save the note.
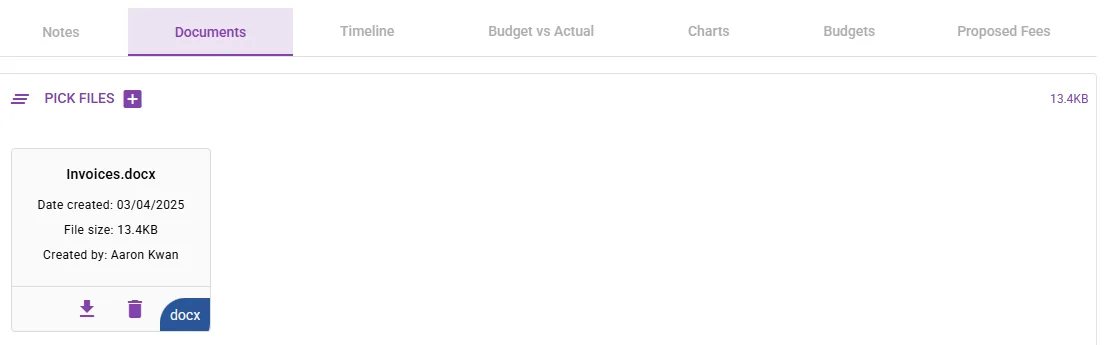
For document upload on a browser, drag and drop the desired supporting files to the Documents tab to attach them to the project.
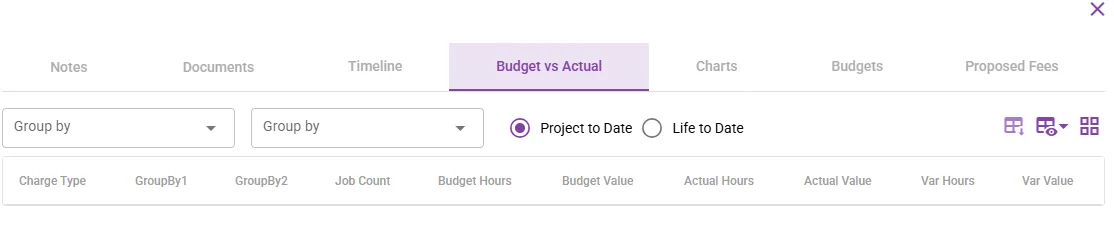
Existing Project Jobs and budget are summarised on the Budget vs Actual view to the right, with 2 x Group by filter options.
Note: The grid view illustration while there are no jobs for this new project yet.
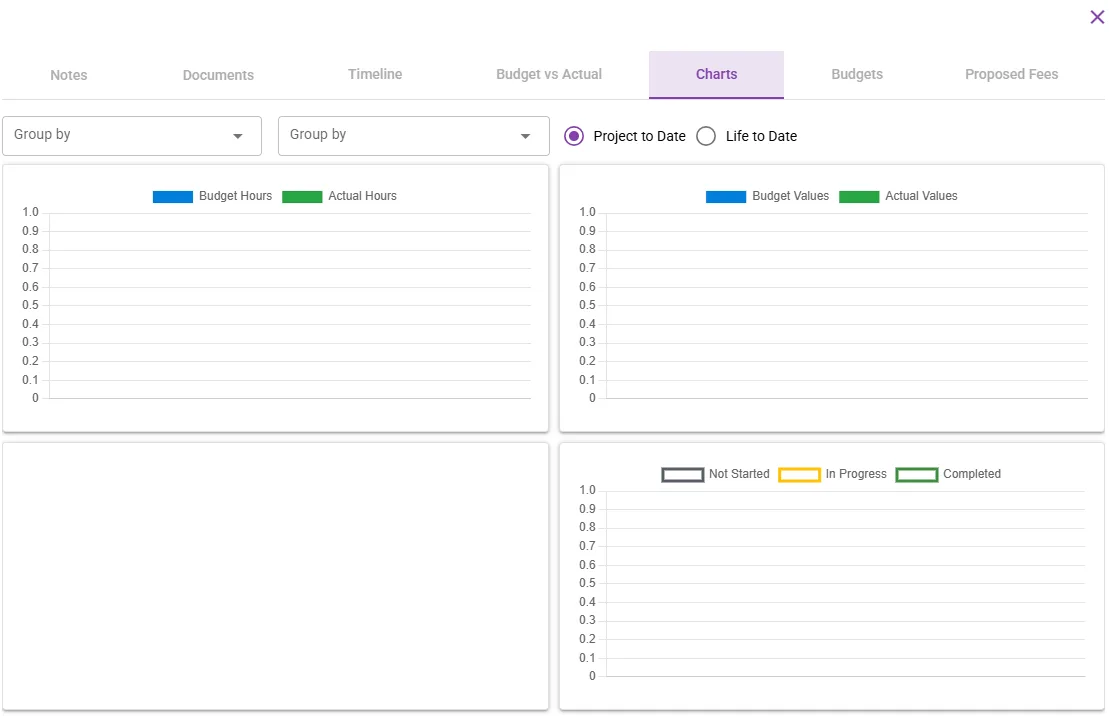
Similarly, existing project jobs are summarised on the Charts view to the right, with 2 Group by filter options.
Note: The graph view illustration while there are no jobs for this new project yet.
Exit the screen by clicking on the Close (x) button in the upper right-hand corner.
A project’s colour in the List view will reflects the current project status and types as per the custom project board settings.
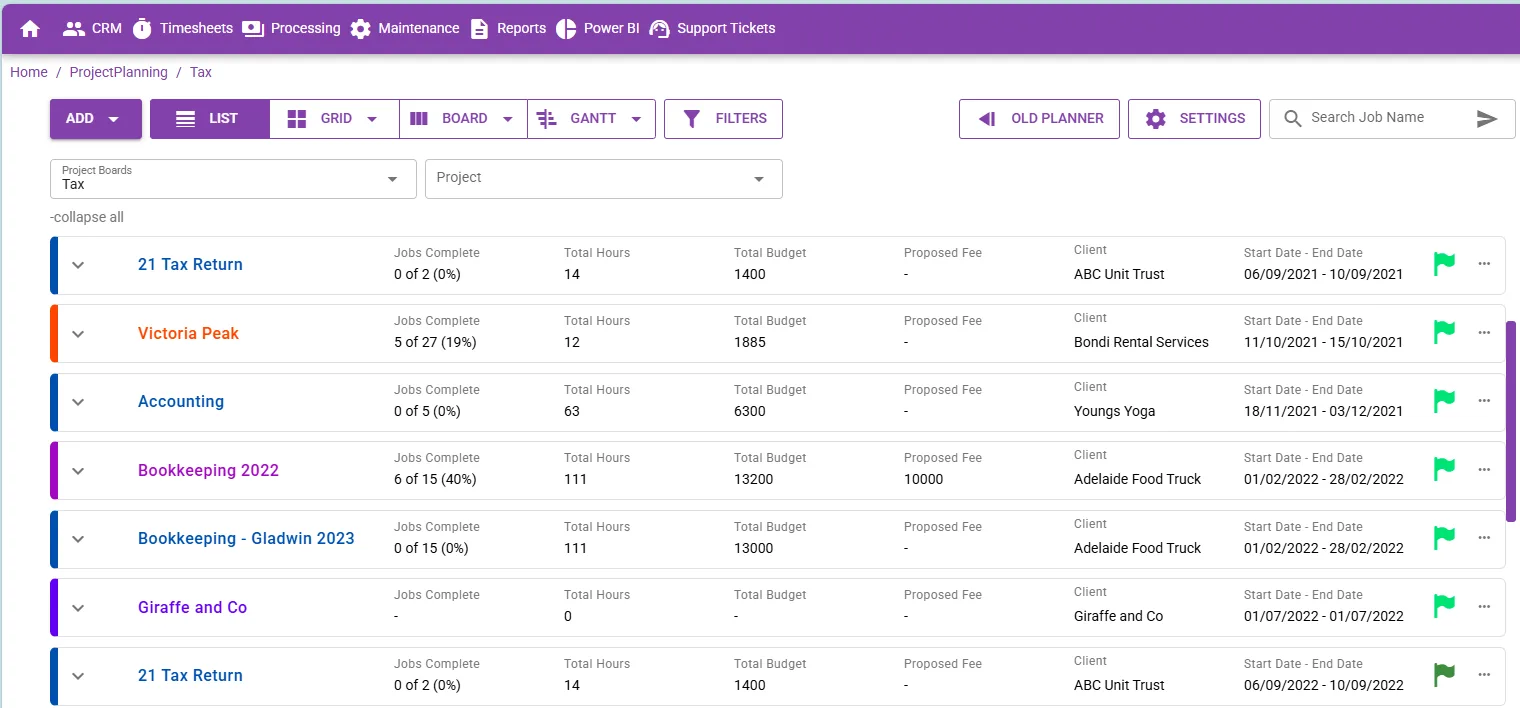
Matching Project Board custom settings reflected in the colour coded Project header.


No Project Overview for the Ad-Hoc Jobs folder
There is no single Project overview for Ad-Hoc Jobs, due to each ad-hoc job being a separate activity. The ad-hoc jobs name on the project list is hence inactive.
Instead, you will access each individual job from the expanded ad-hoc jobs folder.
Expand the project (or ad-hoc jobs folder) from the project list.
Capturing a new project job using the job line format
When you click on the + expand all or on the arrow to the left of the project name, the project details become visible, i.e. the Add New Job line first, followed by any existing jobs.
No jobs have been captured for this new Audit Project yet.
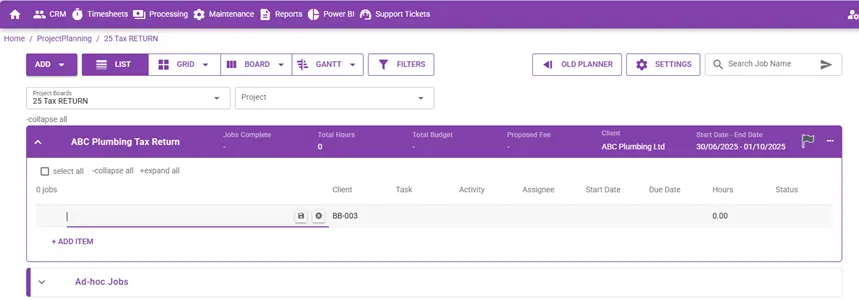
The linear method for adding Jobs in the row directly underneath the Project header makes building up a Project quick and easy.
It also facilitates the easy capturing of recurring and duplicate jobs, and for building up a project concerning a group of clients, e.g. the annual audit of a group.
To add an upcoming Project Job, simply complete the necessary fields in the new Job line from left to right by entering the Job name and where applicable, select items from the lookup lists of the relevant fields.
Job information that can be captured from left to right include:

| Job Name | Client | Task | Category | Activity | Employee | Employee Category | Start Date | Due Date | Hours |
Notes:
None of the lookup fields are mandatory and you could simply have a job title with its start and due dates as part of this project.
Adding a new job’s details is very similar to capturing a timesheet or disbursement, as they share your firm’s CRM setup and database.
The resemblance to Timesheet capturing stems from your firm’s existing setup of Service Lines (SL) and Activities, for example, which also apply to planning out each Job, due to the SL, for example, only filtering out applicable Activities (and Employees), etc.
The Client and Task fields of the Job have auto populated from the overall Project setup.
Choose the Task: Similarly, to the overall Project Task options, the Job Task lookup list accommodates both Client specific Tasks (active Tasks) and the firm’s Standard Tasks.
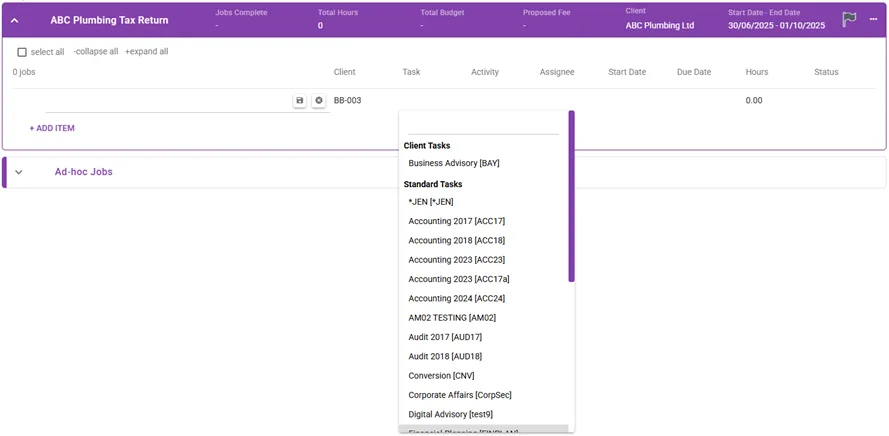
Currently, Standard Tasks make forward budgeting/planning possible. For example, while the 2021 audit is not yet open, you can plan towards it by planning on your firm’s Standard Tasks, until the relevant active Tasks becomes available to plan on.
The calendar Start Date defaults to today’s date. Select the applicable.
The Due Date is left open for manual selection.
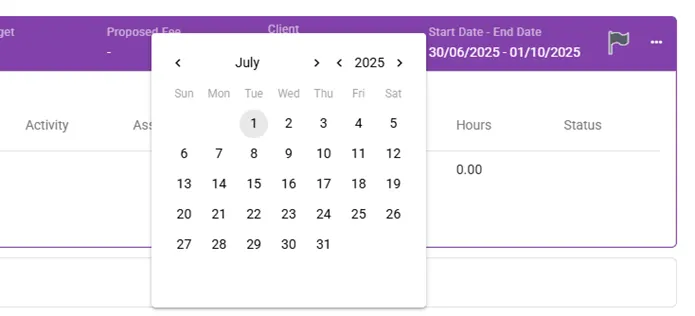
The hours field defaults to 8 hrs. per day. The system will auto-calculate the number of hours per Job, based upon the set Start and Due Dates.

You can adjust the hours by highlighting and overtyping or deleting and capturing the applicable number of hours.
Save the Job by clicking on the save button next to the job name.
The Saved Job is added below the new Job line.
The saved Job summary (not in edit mode) displays only some fields on the face of the page (| Job Name | Client | Task | Activity | Employee/Assignee | Due Date | Status |).
When in edit mode again, all fields are available to view and/or edit.
The new Job line keeps the last entry’s details to assist with capturing another by only having to change the necessary unique fields.
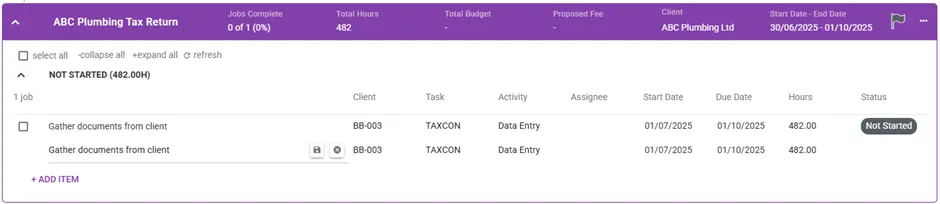


Alternative to manually capturing a Job Name
You could start the new Job by manually entering the Job Name.
However, you could leave the Job Name field empty, in which case it will auto-populate when you select the Activity.
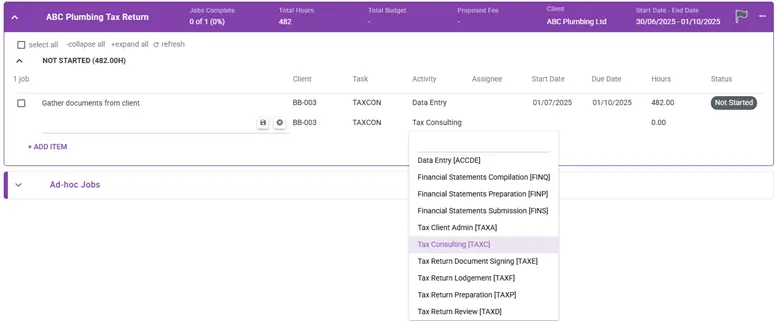
Job Name auto-populated from the selected Activity.
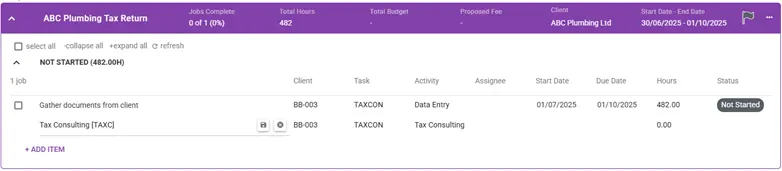
You can manually customise the system generated Job Name, but then the next Activity selections won’t override the custom name and you will have to continue to manually capture the Job names.
To re-activate/enable auto-naming based upon the Activity selection, highlight and/or delete the custom Job Name (clear the field), before you select the next Activity.


Editing an existing Project Job
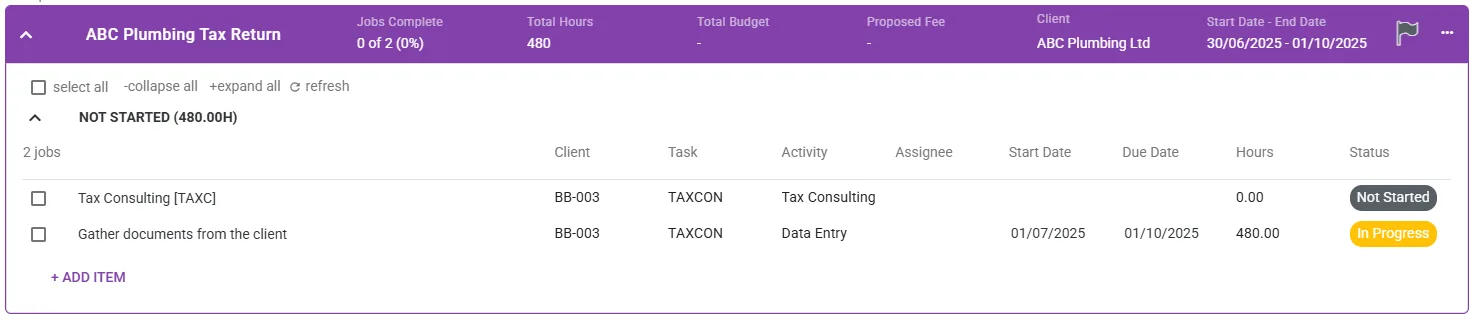
Detailed editing can be done in one of two ways, while the Job Status can be changed on the fly by clicking on the Status button and selecting the desired, without having to open the Job.
Quick edit
Hover over the Job line and select a field to start editing.
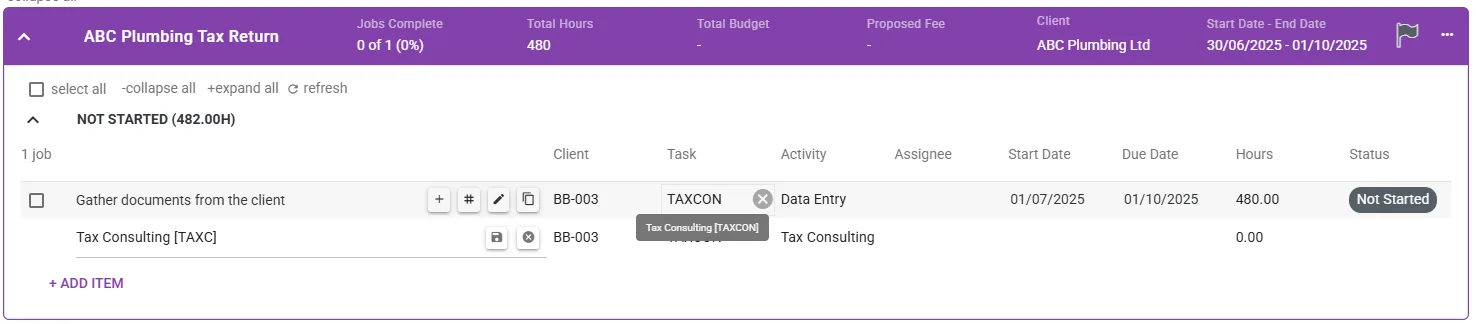
This will activate all fields in the Job line for in-line updating.
Click outside of the job line and any changes will be automatically saved.
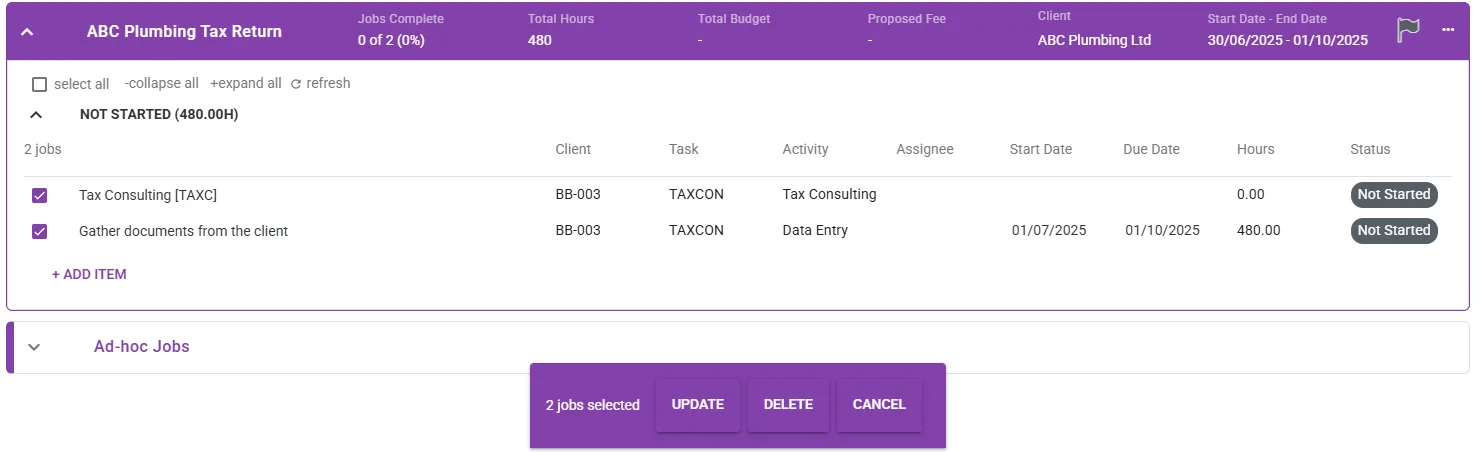
You can update or delete a job by ticking the checkbox on the left and selecting the desired action. Selecting multiple jobs will enable you to update or delete in bulk.
Status change reflected by the Board colour coding of Job Statuses.


Open Job
In the Job Grid view, clicking on the Job name or Open on the lookup to the right of the ad-hoc Job line will open the detailed job window.
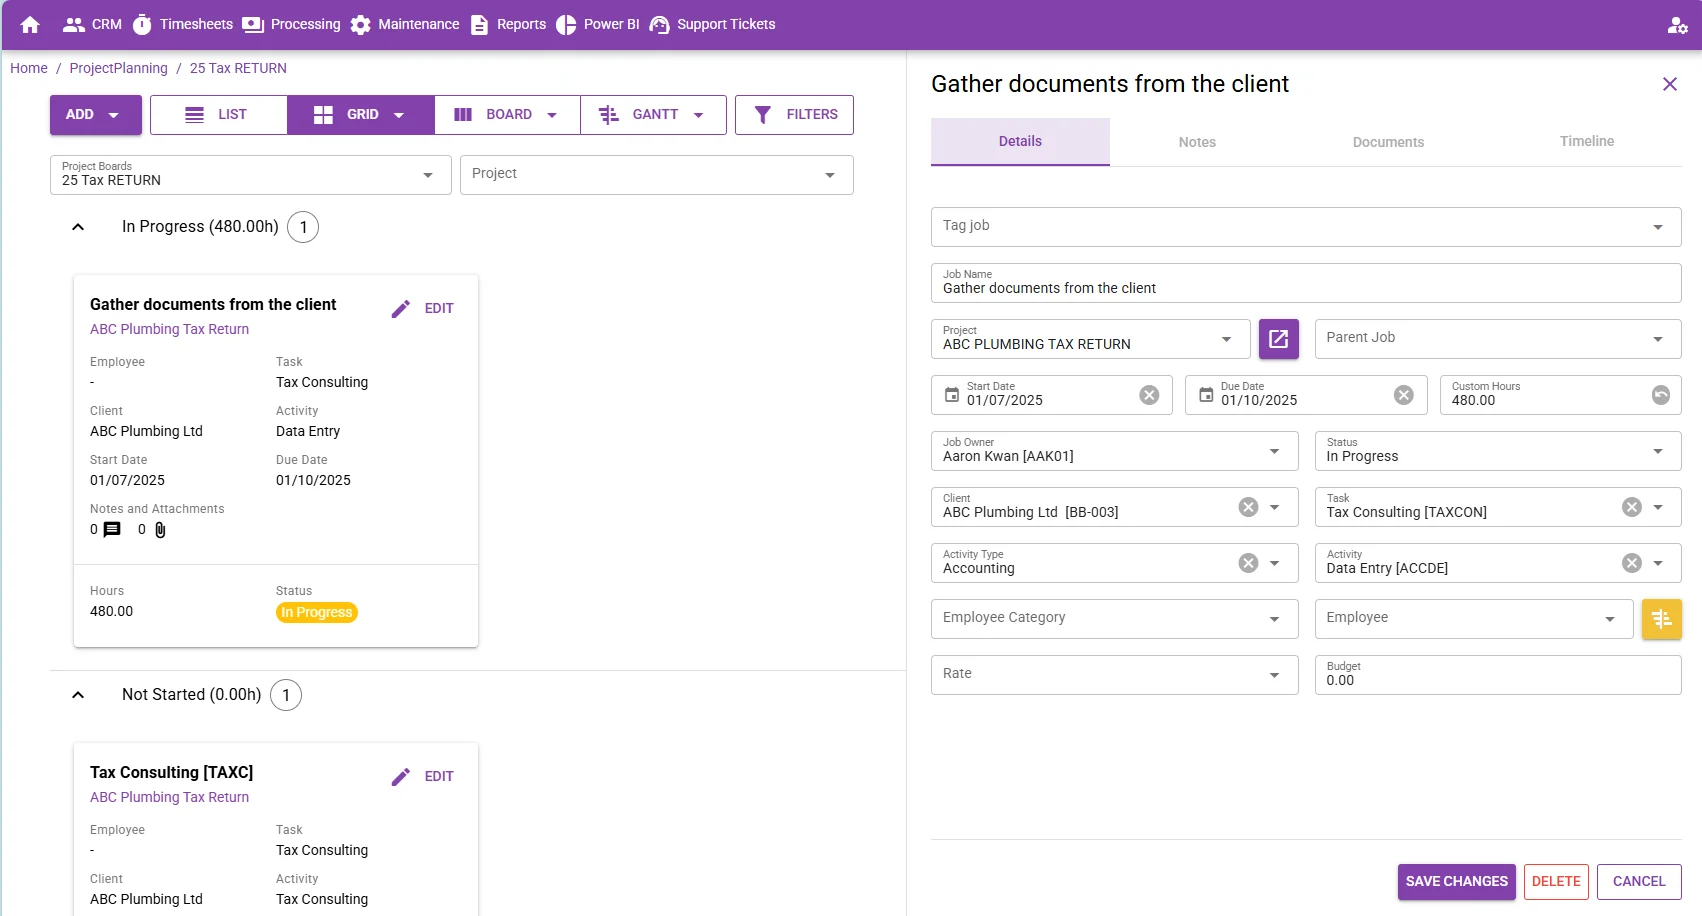
The page shows which project this job is part of.
The detailed settings section is underneath the job description for viewing and/or updating.
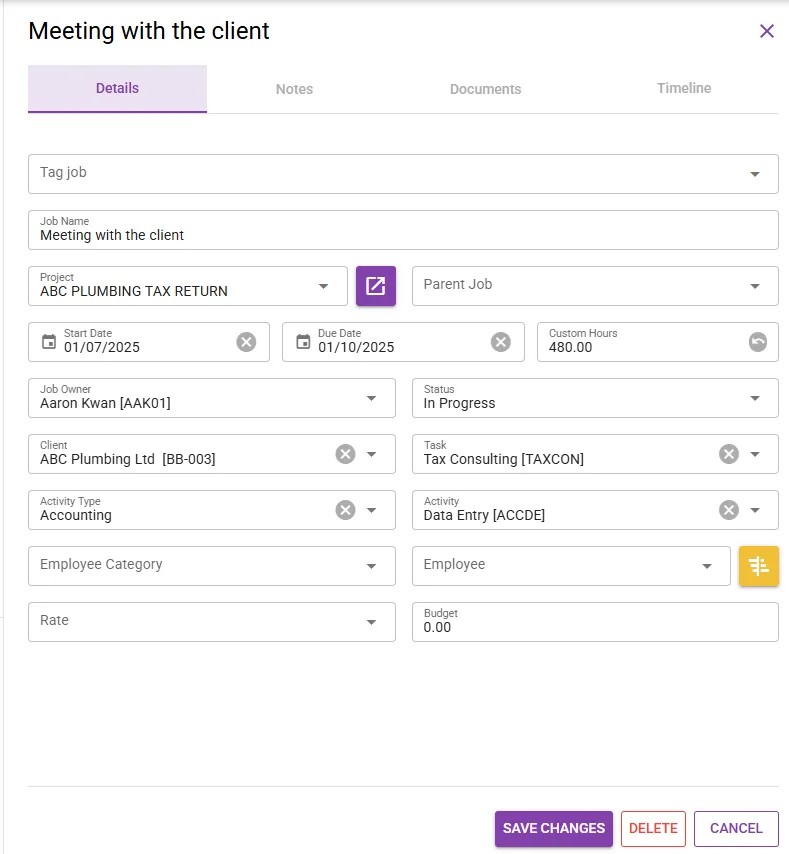
The biggest advantage of this view is the ability to identify available staff resources for a Job by clicking on the yellow Availability map shortcut.
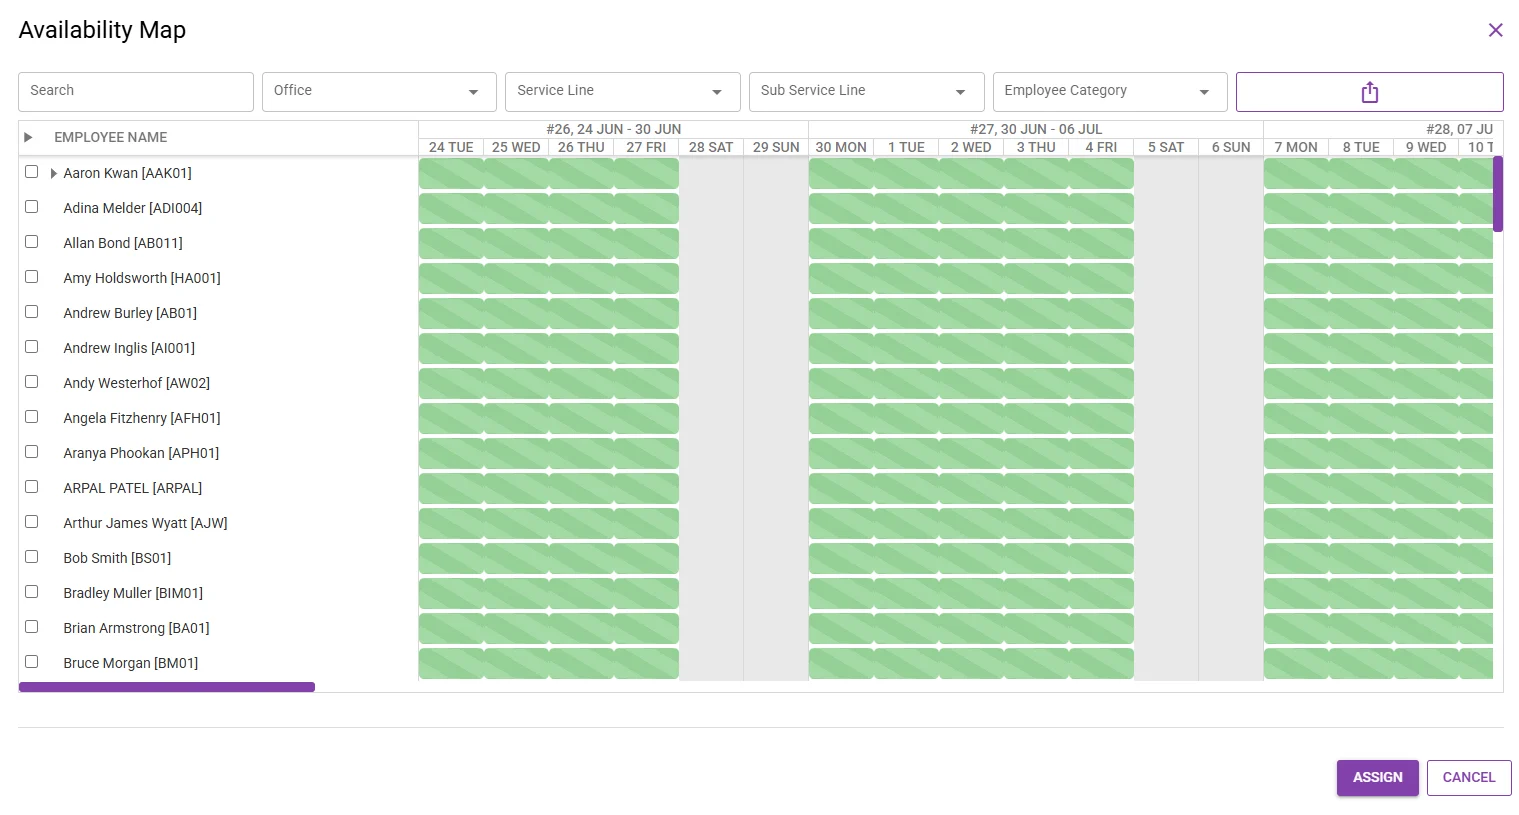
Customise the filters to display specific Employees and to verify their availability.
When you select an employee, the line is shaded for easy traceability in cases where a job spans across a long period of time and requiring scrolling to the right.
Employee availability takes into account ALL jobs from ALL boards.
An Export to PDF option is also available.
Close the window once done.
Click the SAVE CHANGES button to keep any changes made to the Job.
Exit the window using the Close button.
A job could also be deleted from this detailed window.
The relevant Project Board now also reflects the added project with one job currently under the projects section.
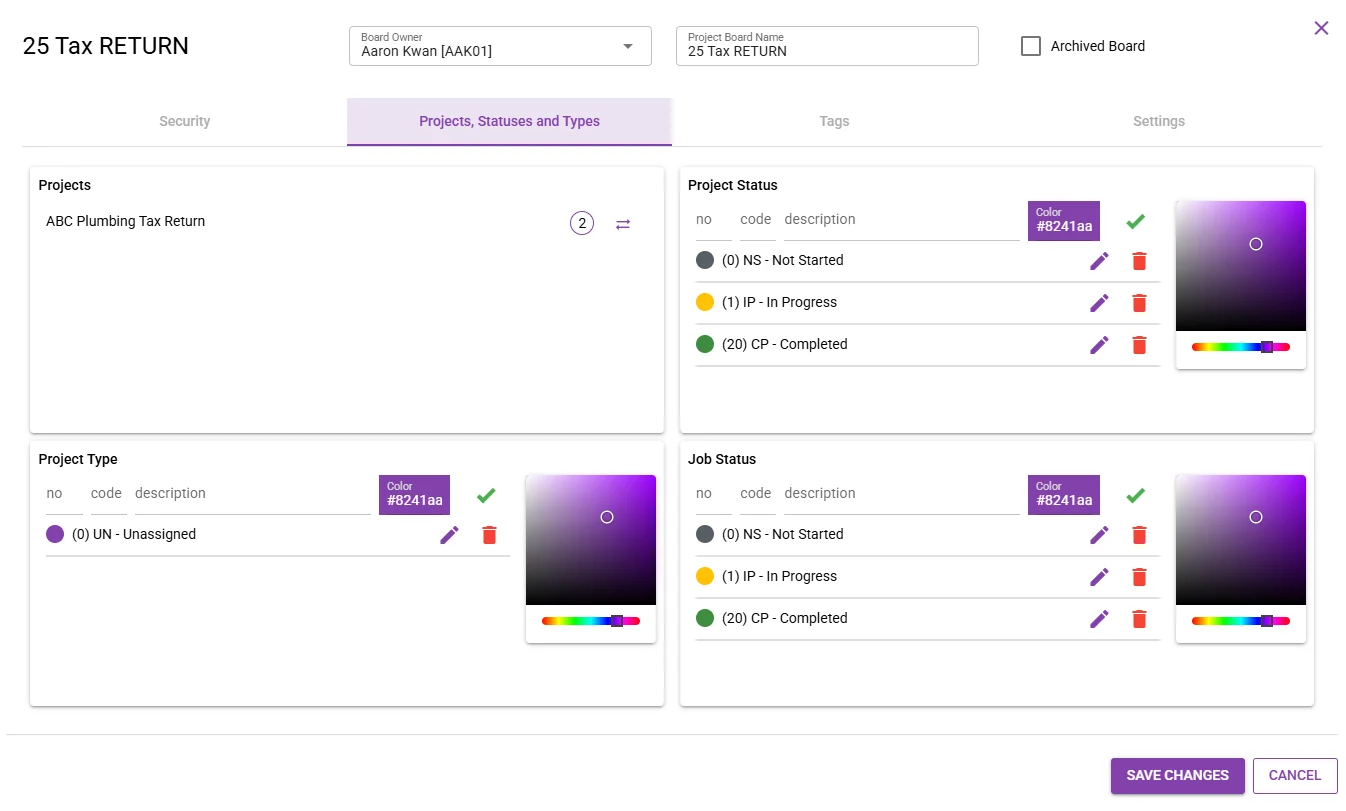


Moving a project from one board to another
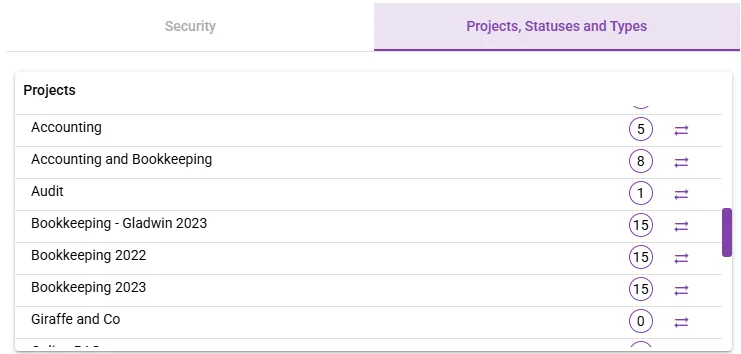
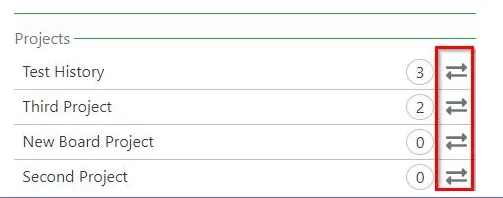
The below illustration shows a list of Project with their number of Jobs each.
The arrows offer Collaborators of the board the ability to Move Projects between boards.
Click on the arrows of the relevant Project and follow the prompts.

Capturing a new ad-hoc job (similar to any project job)
Note: The same principles for adding and editing a Project Job in the linear format, as discusses above, apply to creating an Ad-Hoc Job.
When you click + expand all or the arrow to the left of the folder name, the contents of the folder become visible, i.e. any existing reminders/jobs.
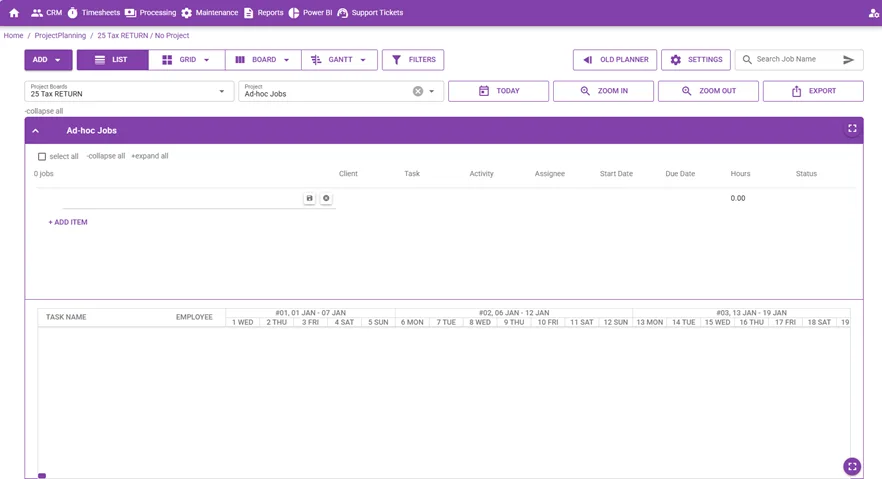
Currently, since no personal Jobs have been captured by the logged in user, only the line for capturing a new Job is available.
To add an upcoming personal reminder/job, simply complete the necessary fields in the new Job line from left to right, by entering the name of the Job and where applicable, select items from the lookup lists of the relevant fields.
Note: None of the lookup fields are mandatory and you could simply have a Job Name and the Start and Due Dates as a personal reminder.Save the Job by clicking on the save button next to the job name.
The Saved Job is added below the new job line.
The new job line keeps the last entry’s details to assist with capturing another by only having to change the necessary unique fields.



Alternative for creating a new ad-hoc job
In addition to adding a new ad-hoc job in the linear format, it can be captured in a window format.
Initiate a new ad-hoc job by opening the ADD menu and select Job.
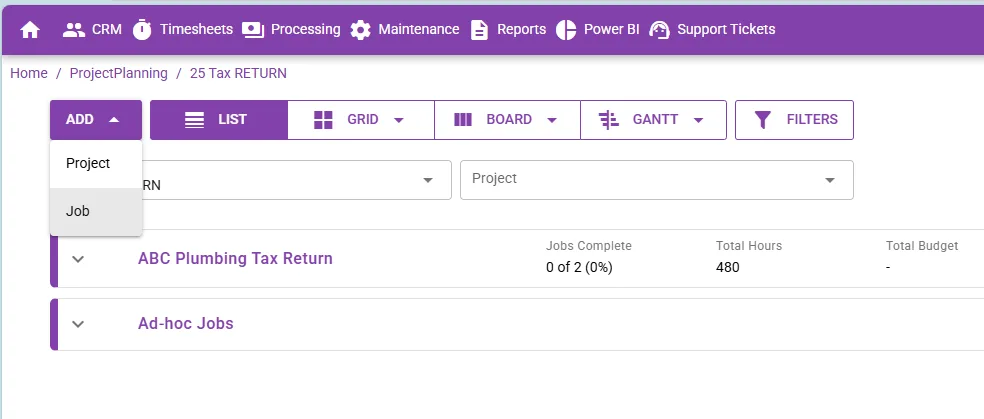
This opens a new Ad-Hoc Job capture screen, which you’re already familiar with and which is again discussed under the next section Editing an existing Ad-Hoc Job | Open Job.
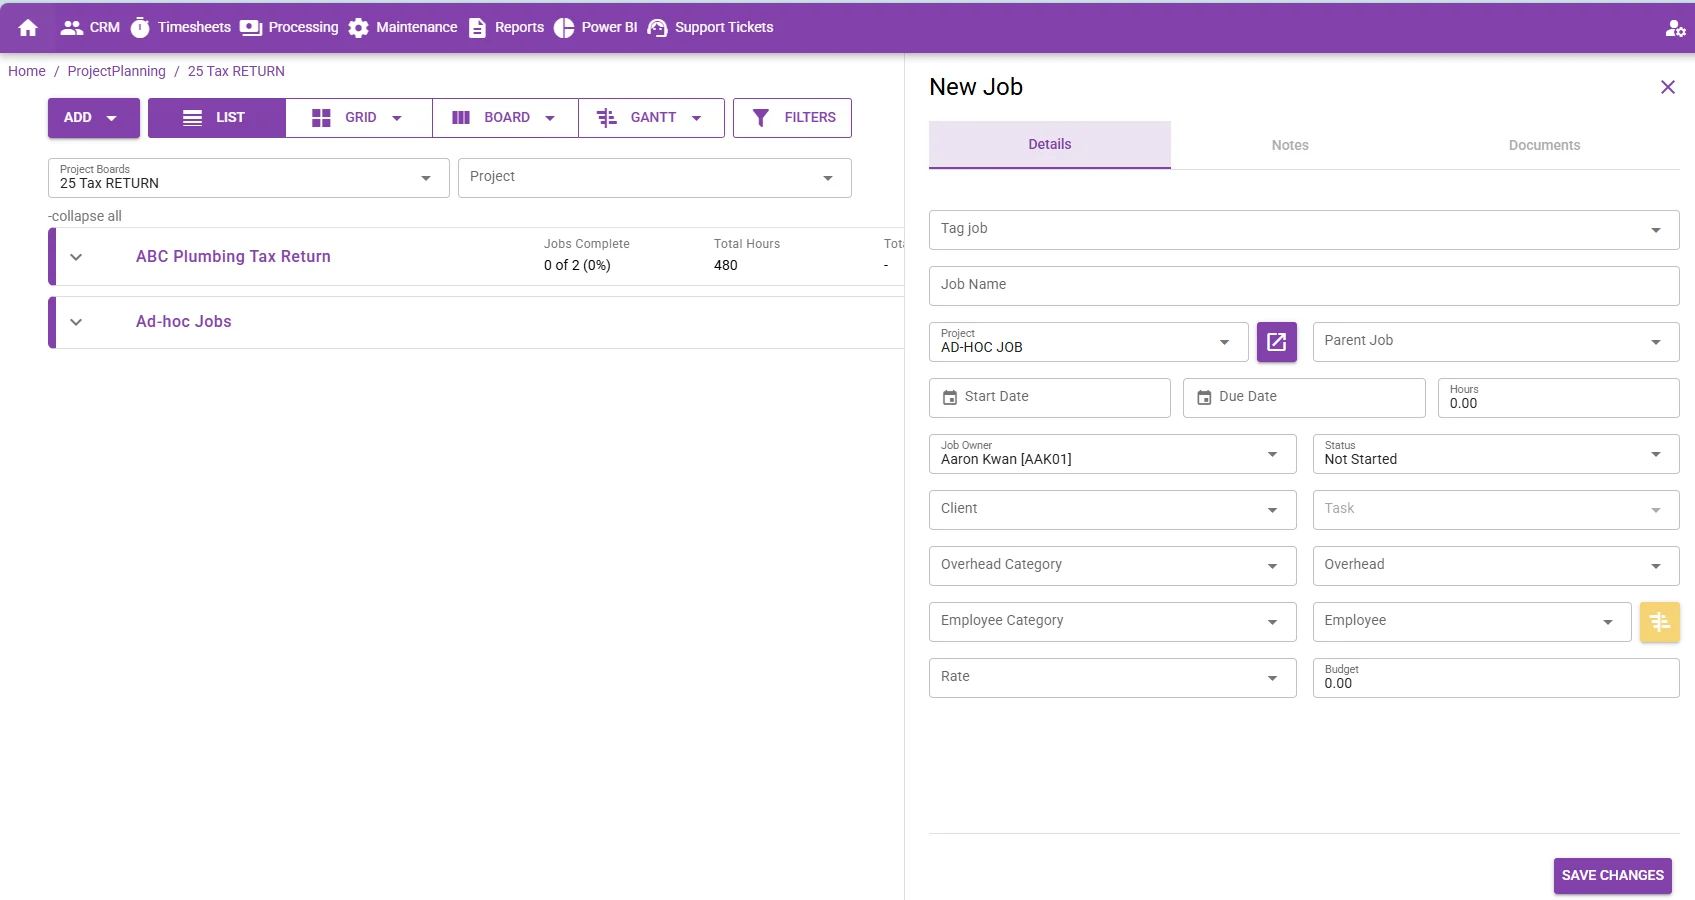


Editing an existing ad-hoc job
Detailed editing can be done in one of two ways, while the Job Status can be changed on the fly by clicking on the Status button and selecting the desired, without having to open the job.
Quick Edit
Hover over the Job line and select a field to start editing.
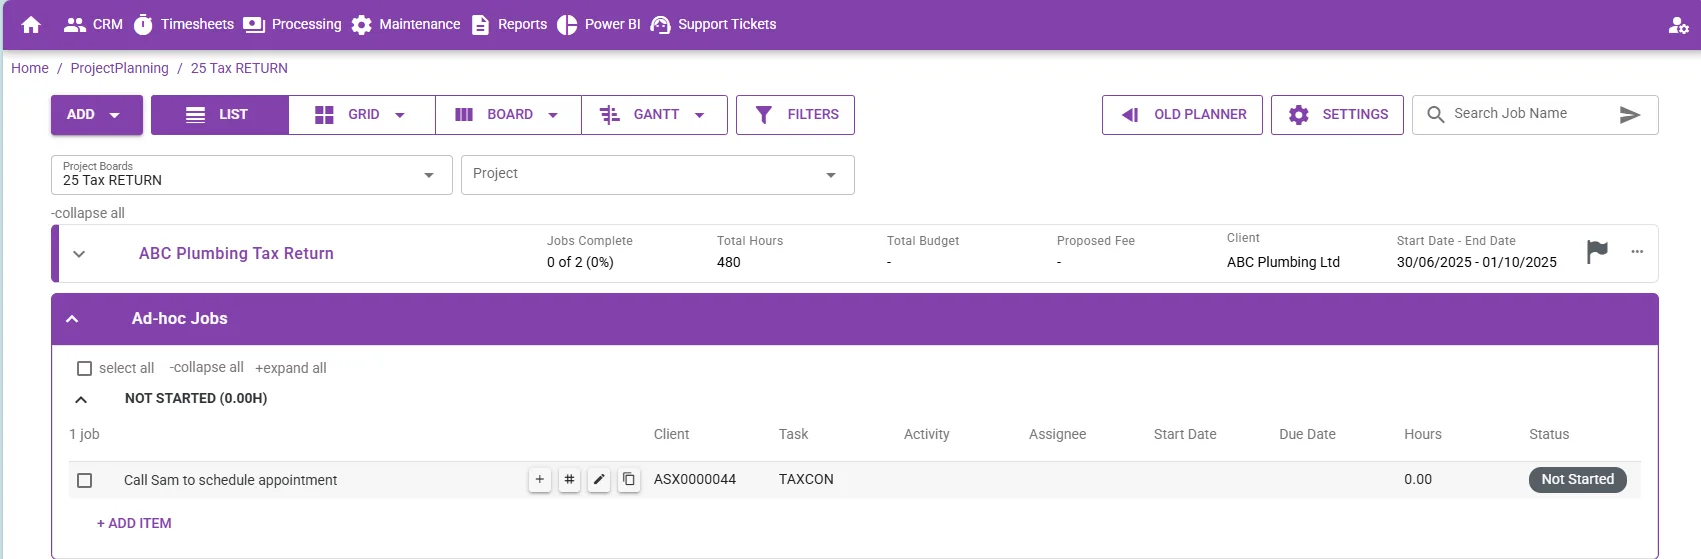
This will activate all fields in the job line for in-line updating.
Click outside of the job line and any changes will be automatically saved.
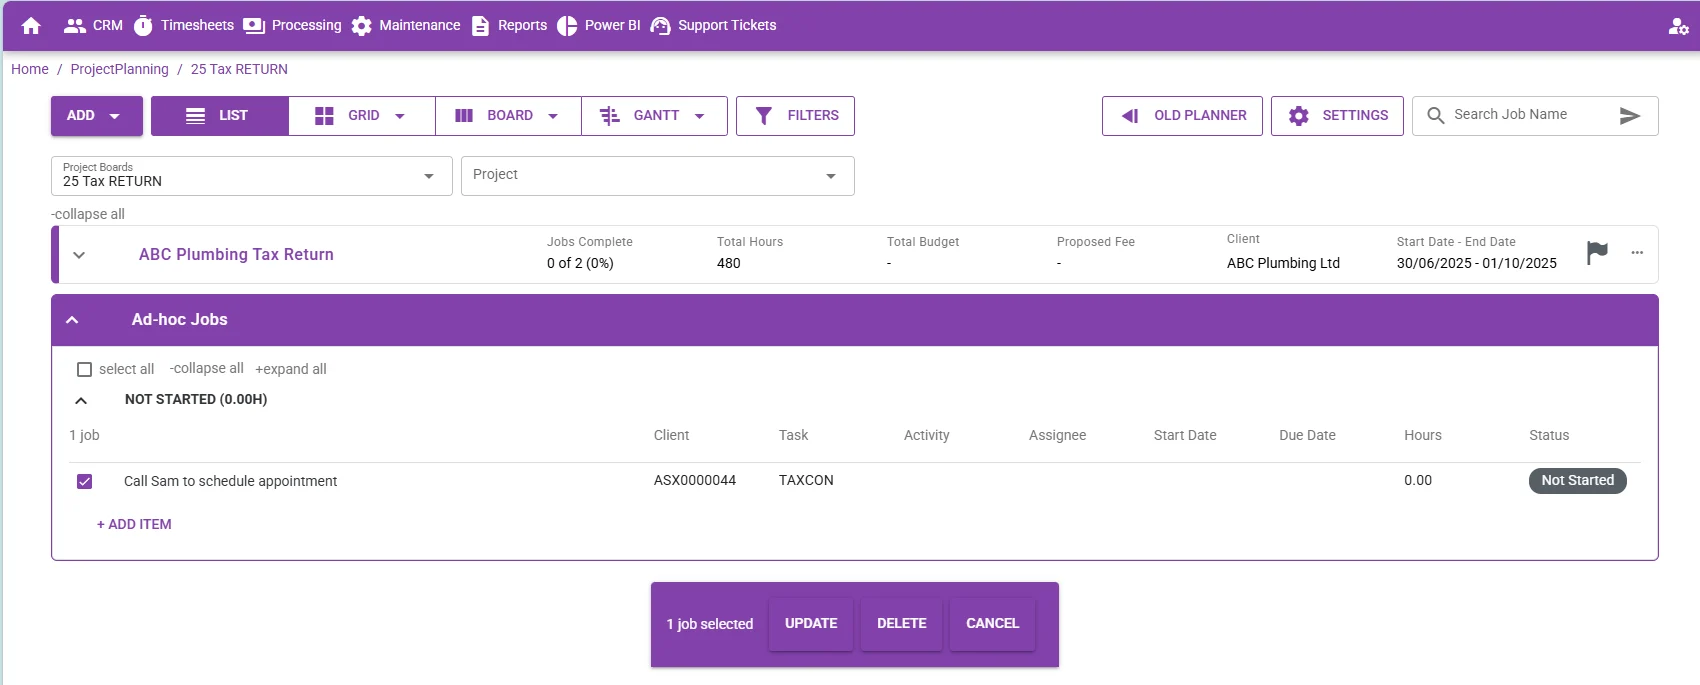
You can update or delete a job by ticking the checkbox on the left and selecting the desired action. Selecting multiple jobs will enable you to update or delete in bulk.


Open Job
Clicking on the Job name will open the detailed Job window.
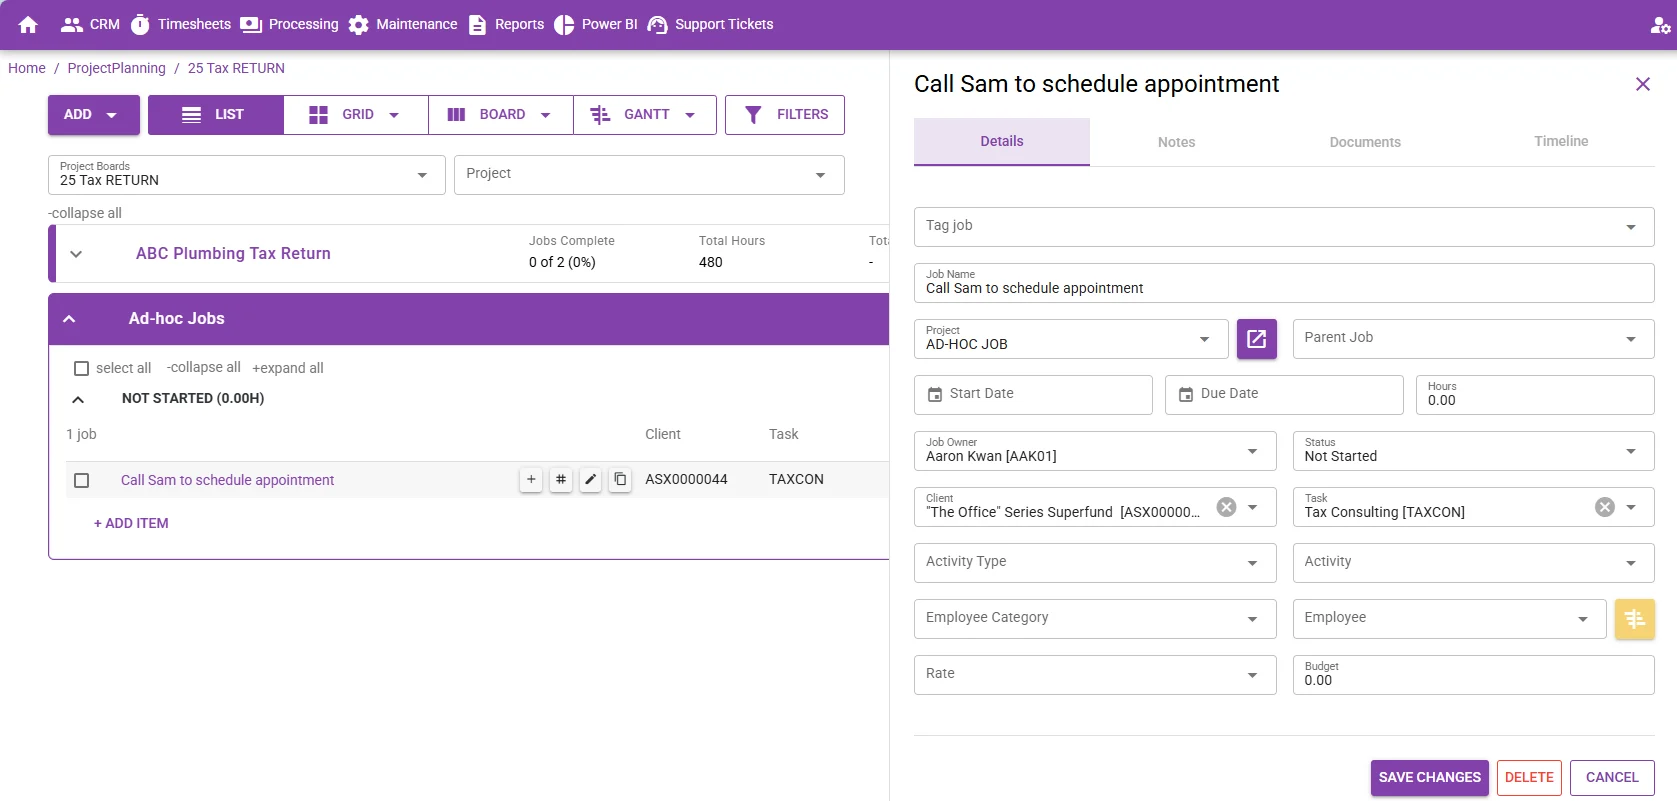
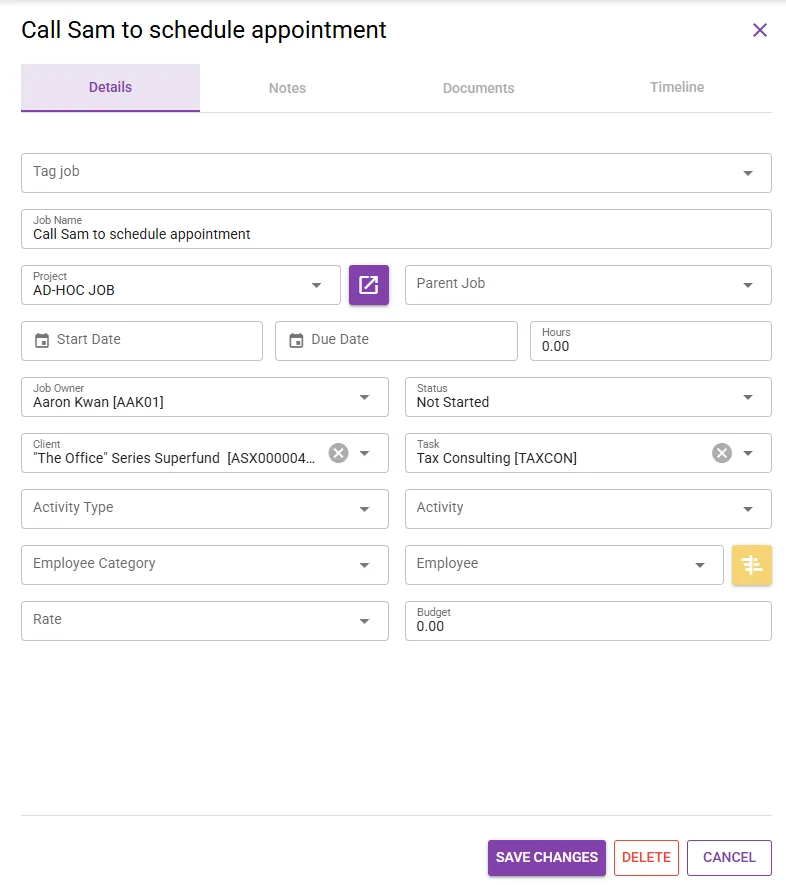
The page shows that the Job is part of the Ad-Hoc Job folder.
The detailed settings section is underneath the Job description for viewing and/or updating.
The biggest advantage of this view is the ability to identify available staff resources for a Job by clicking on the yellow Availability map shortcut.
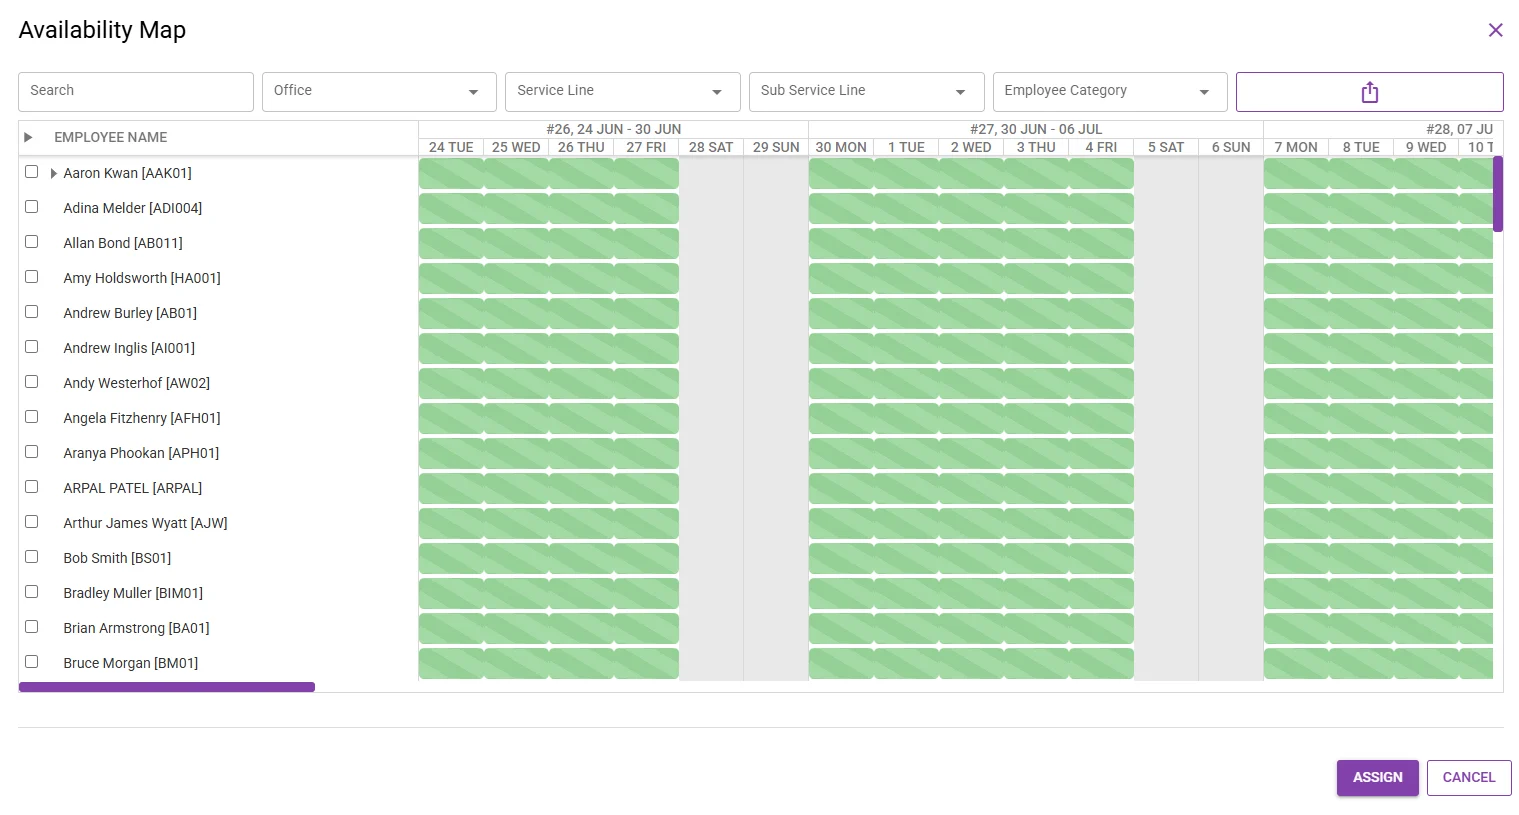
Customise the filters to display specific Employees and to verify their availability.
When you select an Employee, the line is shaded for easy traceability in cases where a Job spans across a long period of time and requiring scrolling to the right.
Employee availability takes into account ALL Jobs from ALL Boards.
shortcut .
An Export to PDF option is also available.
Close the screen once done.
Click the SAVE CHANGES button to keep any changes made to the job.
Exit the screen using the Close button.
The ad-hoc job could also be deleted from this detailed window.


Creating a timesheet entry fro a planned job
Timesheet entries for planned Jobs can be created with the least amount of manual input via the Timesheet widget, Calendar style Timesheet and Timesheet grid.
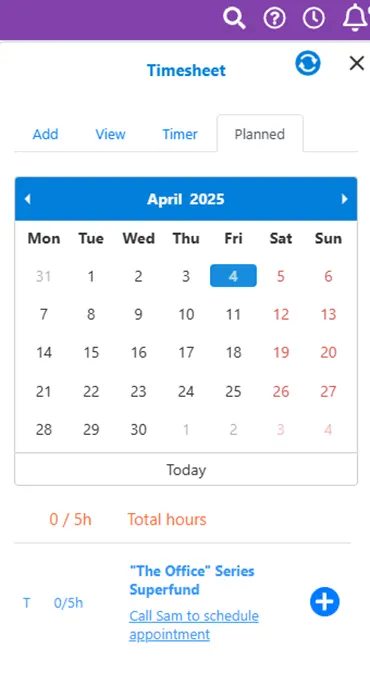
Timesheet widget
It is assumed that the applicable Timesheet Period already exists.
Open the TS widget from the Menu bar.
Click the Planned tab.
Navigate to and click on the relevant Date.
The Planned Jobs are listed below the calendar.
To initiate a Timesheet entry, click the circled + add button to the right of the applicable planned job.
The typical widget Timesheet entry window with pre-populated fields will open for easy editing as applicable, by for example adjusting the number of hours spent.
Save the entry.

Timesheet calendar
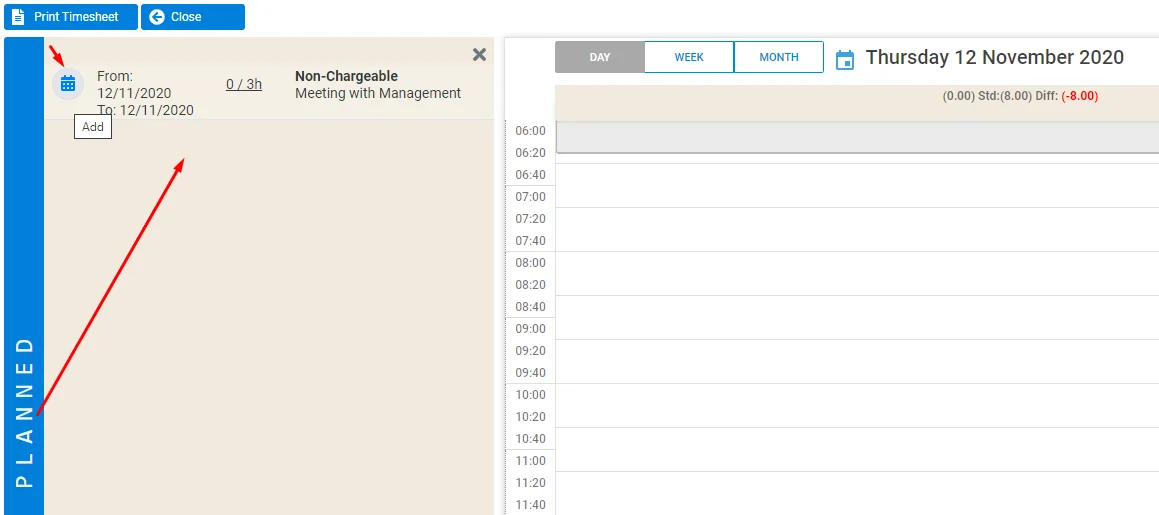
It is assumed that the applicable Timesheet Period already exists.
Open the Timesheets and Disbursements module.
Edit the applicable Timesheet Period from the main Time and Expense page.
Click on the Planned tab along the left margin of the calendar.
Navigate to and click on the relevant Date.
The Planned Jobs are listed to the left of the calendar.
To initiate a Timesheet entry, click on the circled Add button to the left of the applicable planned job.
The typical Calendar Timesheet entry popup window with pre-populated fields will open for easy editing as applicable, by for example adjusting the number of Hours spent.
Save the entry.

Timesheet grid
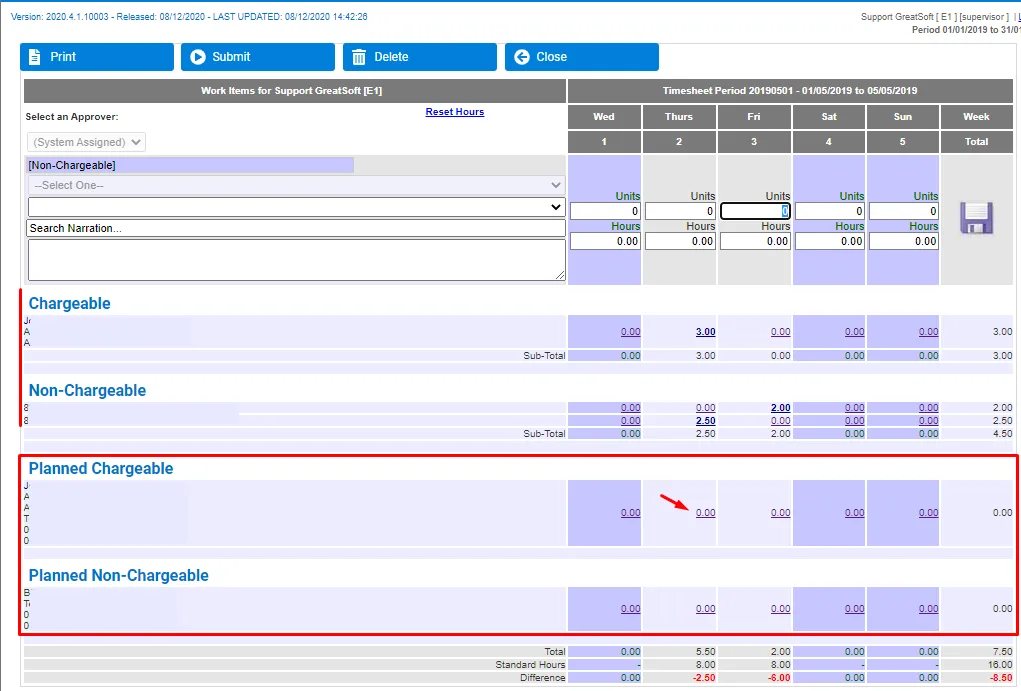
When you access a Timesheet Period that contains planned activities, those Planned Chargeable and Planned non-Chargeable entries’ line items are pre-populated underneath the ordinary Timesheet entries for capturing the actual Time by clicking on the applicable Hours field(s). Also update the entry information as needed.

Notification and reports
1. Emails are sent out to staff to inform them when they’ve been assigned to a new job.
2. Planner also sends out overdue Jobs emails to staff to keep track of what’s overdue.
3. Reports currently include a Budget Report and Project Status Report.