The Employee Budgets utility allows firm administrators to capture Budgeting information into GreatSoft for their Employees.
Employee security
The firm’s administrator needs to assign the Employee Budgets (EmployeeBudgets) Security token to the applicable User Role(s) for this functionality to become available from the Application Navigation Menu | Maintenance.

Accessing the employee budgets dashboard
Access the Employee Budgets page from any location in GreatSoft PM, by hovering across the main Application Navigation Menu access button (1) to the left of the Menu bar. To hide the Menu, click anywhere outside of the displayed Menu.
Click on the Maintenance section to display the available options.
Click on the Employee Budgets option to launch the page.
Here's how to access the User Defined Fields for adding custom columns.


Empty Budget Imports dashboard
The below image illustrates the freshly opened Employee Budget Imports dashboard consisting only of the default/standard columns.
The below image illustrates the freshly opened Budget Imports dashboard with the default/standard columns and 2 x additional custom columns displayed to the right (see Creating/Adding Custom columns section).


Click on the Employees to the left of the grid to view their current Budgets.

Creating / adding custom columns
Users can dynamically add/create (and remove/hide) custom columns via the User Defined Field Maintenance | Employee Budget Type.
Custom columns are created and activated (or inactivated/hidded) by setting them up under CRM Maintenance | User Defined Fields (UDFs) under the Employee Budget Category.
Select the New button to create a new UDF.
The system allows for 2 x data types, Text and Number.
For a custom column to be available and display on Employee Budget table, its UDF must be Active.
To remove/hide a custom column from the Employee Budget table, simply nactivate the UDF.
Custom columns appear alphabetically from left to right per UDF Code, starting at the right-hand side after the Standard columns.
Exporting, importing, editing and saving functionalities all work similar to those of the Standard columns.


Capturing employee budgets
Budgets are captured per Employee per Financial Period setup.
Budgets can either be captured (created/updated) directly on the Employee Budget Imports grid, or captured on an Excel spreadsheet with matching columns, and then imported into CRM.

Capturing (create/update) individual employee budgets directly on the budget imports grid
Select the applicable Employee from the Employee list to the left.
Type Search characters to locate the desired Employee from a long list of Employees.
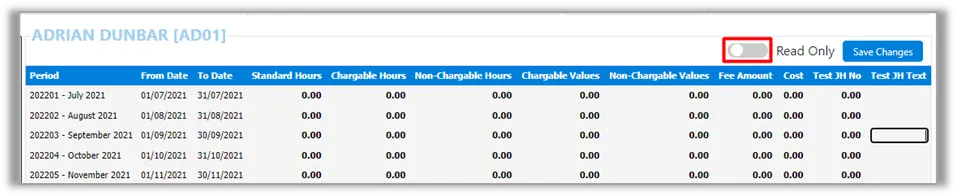
Click on the Read Only button to switch it off to enable capturing (oval button colour turns from grey to blue).
Simply click on the applicable cell that requires updating and capture its value.
Either use the Tab key to move to and select the next cell to the right, or
click on the desired cell to capture the next value.
As is custom across CRM, tabbing moves the cursor focus from left to right per row and from the last cell per row down to the first cell in the next row.
Auto-calculations apply the following formulae during the manual editing of values in the imported and saved Budget tables:
Standard Hours = Chargeable Hours + non-chargeable Hours
A change in the Chargeable Hours will auto-update non-chargeable Hours and vice versa.
Chargeable Value = Chargeable Hours x Employee Rate
A change in the Chargeable Hours will auto-update its Chargeable Value.
non-chargeable Value = non-chargeable Hours x Employee Rate
A change in the Chargeable Hours will auto-update its non-chargeable Value.
Click on the Save changes button after having updated the info.
To disable editing, click on the blue coloured Read Only button (the oval button colour turns from blue to grey).
Download the template to create employee budgets from scratch
To create an Employee Budget from scratch, download the blank template to populate the complete Employee Budgets manually.
The empty exported spreadsheet’s columns exactly match those of the Budget Imports grid, including any custom columns.
Click on Enable Editing to activate editing of the spreadsheet.
Create the first Employee's Budget by capturing the required information:
Employee: Capture the exact Employee Code that matches the Practice Management system (verify the correct codes on the Employee list to the left of the Budget Import grid.)
Period: Capture the applicable Periods in accordance with the PM system’s Financial Year setup, e.g. 202201 - June 2022, 202202 - July 2022, 202203 - August 2022, etc.
The From and To Dates will automatically populate based upon the set Periods upon import into the system.
Standard, Chargeable and NonChargeable Hours: Capture the Budgeted Hours each per Employee and Period.
If any 2 x of these 3 x Hour values are captured, the remaining Hours will not auto-calculate upon import. Either capture all 3 x values in the spreadsheet before Import, or after the Import before saving the updated Budget.
Chargeable and NonChargeable Value, Fee Amount and Cost: Capture the Budgeted Values each per Employee and Period.
Value fields that are left empty will reflect as zero (0.00) upon import.
Custom columns: Capture the applicable information per Employee and Period.
Number fields that are left empty will reflect as zero (0.00) upon import.
Text fields/cells that are left empty will reflect as empty upon import.


Use the first Employee’s Budget to set up others
After having completed the first Employee’s Budget, to create equivalent/similar Budgets for other Employees underneath, highlight the first Budget, and copy & paste it as many times as needed underneath in the same spreadsheet.
Simply change the Employee Codes per Employee Budget, as well as any other values as necessary.
Save the spreadsheet once completed.
Import the completed & saved Budget spreadsheet into CRM (see details below).

Export existing employee budgets to Excel
Exported Employee Budgets offer an easy way of editing existing Budgets in Excel and/or to duplicate an Employee’s Budget to another.
Set up the applicable filters to display the desired Employee Budgets.
Click on the Export button to export existing Budgets in CRM to
Excel.
The columns and cell values in the exported spreadsheet correlate with those on the Employee Budget grid.
The Budget information of All Employees that match the currently selected filters are exported and saved into the Excel spreadsheet, and not only the currently selected Employee’s Budget that shows in the grid.


Create/update employee budgets in Excel for re-import into Practice Management
Update the necessary Budget values on the exported
spreadsheet.
Where applicable, highlight and copy & paste an Employee’s Budget information for other similar ones in the spreadsheet.
Empty cells in the spreadsheet will keep the matching values in the Practice Management system unchanged upon import.Save the spreadsheet once completed.
Import the completed & saved Budget spreadsheet into CRM.

Importing employee budgets from Excel
After having finalised and saved the Budgets spreadsheet, click on the Import button to upload it into CRM.
When importing Employee Budgets from Excel, all cells in the spreadsheet will correctly correlate with matching cells on the Employee Budget grid on the PM Budget Imports dashboard.
When imported back into Practice Management, any changed value (zero & non-zero) will overwrite existing Budget information in the system (see details further down).
Empty cells in the spreadsheet will leave their matching fields unchanged upon import.Verify the imported Budget information, before saving it in Practice Management.
Modify (edit, delete or add) the imported data as applicable, before
saving the imported batch.
Additional rows of Budget data that has not been captured and brought into the system via the imported spreadsheet can now also be added by capturing and saving (ü) additional information in the add new row fields directly above the grid.
If any errors are detected upon save, you'll be asked to run the Check Data. This will highlight any captured Employee(s) or Period(s) in the spreadsheet that do not exist in the database.
Once the errors have been corrected through re-capturing, or by fixing the spreadsheet and re-importing it, Save the Budgets. Saving will overwrite any existing Budgets for those Employees and Periods.


Auto-calculations when importing Employee Budgets from Excel
The Chargeable, non-chargeable and Standard Hours should either be manually updated if they’re brought in from Excel with an imbalance, or the system could rectify imported imbalances automatically by enabling the Auto Calculate checkbox.
The system remembers/saves the last setting when returning to the New Budget Import utility again later.
When the Auto Calculate option is enabled, any Standard Hours, non-Chargeable Hours, Chargeable & non-chargeable Values that have been
captured on the Excel spreadsheet are ignored. The Auto Calculation will only use Chargeable Hours to recalculate the applicable fields by rate for that user.
The non-Chargeable Hours are calculated as the difference between the Standard and Chargeable Hours, which is then multiplied by the Employee Rate for calculating the remaining values.

Illustrative example of editing existing Budget via an Excel Import
Employee Budget before importing edited data.

Saved spreadsheet being imported.


Importing custom column data
The system will ignore any custom column data during the import if such imported column is not active/visible on the currently used Employee Budget table’s columns (based upon the custom columns that are currently active in the Employee Budget UDF Category).
During an import, the custom columns can be positioned anywhere in the spreadsheet, as the system matches the available/active headings in the Employee Budget table to those in the spreadsheet. It is therefore important to ensure that heading descriptions are exact matches.
Data of a custom column will be excluded from the import if the column heading in the spreadsheet doesn’t exactly match the set-up Employee Budget UDF Description.
Editing a custom Text type field directly on the Budget table is possible as with any Standard columns: