The Integration processes described in this document do not change any data for Clients in GreatSoft or Xero without an action being initiated by an Administrator.
The following considerations must be noted before initiating Update actions:
GreatSoft tracks Client data that it retrieves from Xero in the Sync Area and it uses this data to perform matching operations to link a GreatSoft client with a Xero Accounting client.
The GreatSoft tracking records of the Xero Client data must be updated regularly – at least weekly.
Actions to update Client changes to Xero or GreatSoft will affect key fields for a Client.
NB: An update to Xero will change only key field values for a client in the target app where changes are found and are amongst those having a tick in the Update column in the table in Appendix 1. Update GreatSoft” on the other hand, will only insert new clients if they do not exist.
See Appendix 1 for a detailed list of the Fields that are updated for Clients.
Getting started
Open the Integrations area by clicking on the Settings Menu access button (1).
Click on the Integrations Menu option to launch this functionality (2).

The system will display a list of Integrations that are configured and activated for the firm.
Click on Xeroto display the Integration Profiles for Xero.
Multiple Integration Profiles can be configured for a firm. This must be done for each Xero instance GreatSoft will be connecting to.
All available profiles will be displayed if more than one Integration Profile is configured.
Integrations profiles will be configured by or under the supervision of a GreatSoft consultant when needed.
The Profile will show a Connected/Not Connected Status for each Integration profile.
Click the Connect button to surface the Xero Token viewer.


The current token for the profile will display with the scopes used, Token Expiry and Refresh Expiry. If there is no token or a revoked token, the blue connector button will appear.
Click the button to initiate the Consent Flow between GreatSoft and Xero.
GreatSoft will begin its connection to Xero. You will be prompted with the login to Xero screen.


Enter your Username and password to Xero and click Log in.
Enter the Authenticator code to pass the Multi-Factor Authentication test.
Once you have logged into Xero, Xero will prompt you to allow GreatSoft Access to your Xero Account. Click the Continue button.
Once you have allowed access, GreatSoft will redirect you back to the Integrations page. The Integration card should now display a green icon and the word Connected if the process is completed successfully.


Users also can remove access to a profile, to do this click the Connect Button.

Clicking the Red revoke button will Revoke the current token and disconnect GreatSoft and Xero

If you revoke the token, you will be required to redo the Connection steps to reconnect GreatSoft and Xero.
If you have issues with authorizing GreatSoft access to Xero, please contact your Xero Administrator and ask them to give your Account API access permissions. Alternatively please ask a user with Acces rights to connect GreatSoft and Xero.
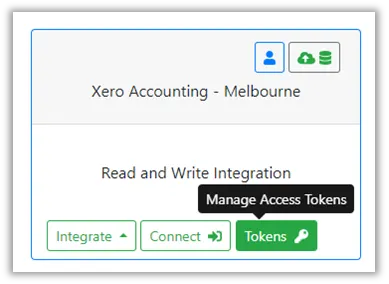
All profile tokens can be viewed by clicking on the Tokens button on the Profile page.
You can now view active, expired and revoked tokens. Flagging the filter box will include Tokens for the filter in the grid below. The grid allows actions on each token in the list
Show token details. Will pop up the Token information

Refresh Token Information.

Revoke Access Token (Only activated if the token is active).

Delete Token. This will delete the token entirely from GreatSoft and remove any history of this token.

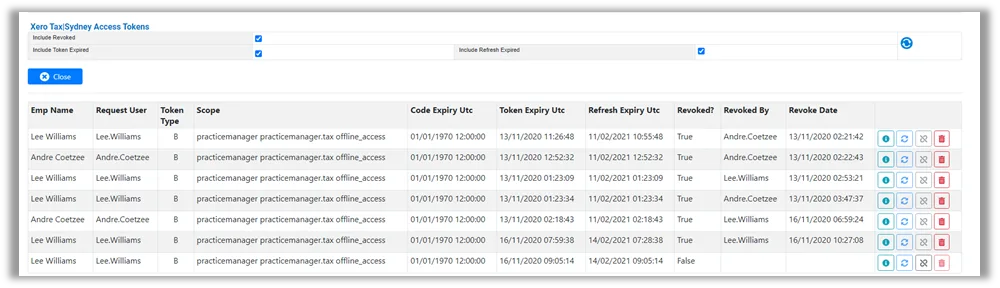
Click the close button to navigate back to the Integrations page.
The Integration profiles for Xero caters for users who access multiple Xero Accounts (Tenants) with a single login. When accessing the Integration profiles for Xero, each integration card will prompt you that there is no Associated Entity with that profile.
Click the Connect button and follow the onscreen prompts to set the Associated Entity for the Integration profile.
After clicking the Associate Entity button, the Associated Entity window will appear for you to complete the assignment of the default Entity for this profile.


Xero Accounting Integration
Client Integration
Click on the Integrate button, then select the Client button of a selected Profile to launch the Integration dashboard for Xero.
The date of the Last Sync will be shown in the information bar. This date will be used as the start date to retrieve a list of clients modified in Xero.

This will open the Clients Integration page.
The date of the Last Sync will be shown in the information bar. This date will be used as the start date to retrieve a list of clients modified in Xero.

Selection Filters
The following filter options are available for the page.
Office – This value will be displayed by default when multiple profiles exist for a particular Integration Type.
Entity Type – Use this selector to filter for a particular type of entity if needed.
Group – Use this selector to filter for a particular Family Group.
Partner – Use this selector to filter for a particular Partner.
Manager – Use this selector to filter for a particular Manager.
Incharge – Use this selector to filter for a particular Incharge.
Search – Use the search box to search for part of a client name, code or TFN.
Status– This selector can be used to display clients for one of the following Statuses:
All : Displays a list of Clients that are matched between GreatSoft and Xero. This list also includes Clients not in Xero or Xero clients not in GreatSoft.
Matched: Displays a list of Clients that exist in GreatSoft and that can be matched to a client record in Xero.
Displays a list of Clients that exist in GreatSoft and that can be matched to a client record in Xero.
The matching of Client records is performed using one of the following values:
Client Code GST Number Client Name | The GreatSoft and Xero Client records will be linked if any one of the following values on the left is matched. All these values can be captured in Xero in the Contacts area. |
New Client for GreatSoft :Displays a list of Clients that exist in Xero but cannot be matched to a client record in GreatSoft.
New Client for Xero: Displays a list of Clients that exist in GreatSoft but cannot be matched to a client record in Xero.
Update to Xero: Displays a list of Clients that are matched between GreatSoft and Xero, but have had changes made in GreatSoft that should be sync’d to Xero.
Specific fields are tracked on the GreatSoft Client record so that when a change is made the status of the row in the Integration profile will reflect as “Update to Xero”. The tracked fields are as follows:
Office Costing Flag
Name
Entity Type
GST/VAT Number
Email
Telephone
Address
Physical
Postal
Date of Birth
(Individuals only)
Title
(Individuals only)
Cell Number
(Individuals only)
Retrieve full Client list: This checkbox allows for a full client list refresh to be triggered when a Refresh from Xero is performed.
Clear Sync Errors: This checkbox will tell the next Grid refresh to clear all Sync errors in memory.
Refresh data list button: This button will reload the displayed list based on the filter selections.
Tab Sections
Multiple Tab sections are displayed on the page as determined from the Profile Settings.
Clients – This page will always display and it will show information about Clients.
History – This page will always display. It will show an audit trail of the Sync actions initiated together with details of Exceptions.
Source – This page will display a list of documents retrieved by the Integration when the Refresh from Xero Action is successfully initiated.
Further explanations are provided below for each of these sections.
Clients
This page will display the matching information for Client records. The following button actions are available for Clients

Flag All – This option will flag rows based on the selected filter settings.
Remove Flags – This option will remove flags from rows based on the selected filter settings.
Refresh from Xero GL
This process will not update the live information in GreatSoft.
Information that is retrieved from Xero will be saved in the Sync area and is used for the matching reports.
Live information will only be changed by executing a process for one of the Update buttons.
Refresh from Xero action will retrieve a client list from Xero.
The Xero Client list is saved in the GreatSoft Sync area and matching operations are performed to link a GreatSoft client with a Xero client. Matched clients will be marked as Matched once the “Refresh from Xero” process has been completed.
See above for information about the fields that are matched.
Live information will only be changed by executing a process for one of the Update buttons.
NB: The Refresh from Xero button will be greyed out if there are any records in the “Update to Xero” status. This is to make sure that all data is updated to Xero the Sync process is run.
Update Xero GL
This action will update Xero Client values using the values from the GreatSoft Client record.
Mark the client records that must be updated by clicking in the Flag checkbox for a row.
This action can be performed for items having a Status of Unmatched Xero, Matched or Update to Xero.
Update GreatSoft
This action will create new clients only and update GreatSoft Client values using the values from the Xero Client record.
Mark the client records that must be updated by clicking in the Flag checkbox for a row.
This action can be performed for items having a Status of New Client for GreatSoft.
When Clients are added to GreatSoft various default settings will be applied.
See Appendix 2 for more information about the settings.
When Client Auto-numbers are enabled in GreatSoft, a new Client Code will be generated in GreatSoft and the Xero client record will be updated with the new client code.
The Office Costing services flag will be enabled when a client is matched with Xero.
If you are selecting to Update Xero, the Xero record will be overwritten by the GreatSoft Client record. Users need to remember that GreatSoft is regarded as the source of truth.
The Integration page action buttons are available based on the business rules detailed below:
When the Integration page finds any clients with pending changes to be sent to Xero, the “Refresh from Xero” button is greyed out no matter the Status selected. This will ensure all pending changes in GreatSoft are sent to Xero before new data and matching is actioned using the “Refresh from Xero” button.
When the Status is selected as “New Client for GreatSoft”, the individual tick boxes are removed from the grid rows. The tick box on the left-hand side of the row is now made available to flag the row. As the status is set to process clients from Xero to GreatSoft, the “Update Xero” button is greyed out as this process cannot be actioned.
When the Status is selected as “New Client for Xero”, the individual tick boxes are removed from the grid rows. The tick box on the left-hand side of the row is now made available to flag the row. As the status is set to process clients from GreatSoft to Xero, the “Update GreatSoft” button is greyed out as this process cannot be actioned.
When the Status is selected as “Update Xero”, the individual tick boxes are removed from the grid rows. The tick box on the left-hand side of the row is now made available to flag the row. As the status is set to process changes from GreatSoft to Xero, the “Refresh from Xero” and “Update GreatSoft” buttons are greyed out as these processes cannot be actioned.
When a Matched Clients Office Costing Flag is unticked, the client should be archived in Xero. The Integration page will show the Client as “Update Xero” and include the (Archive) wording in the Status on the grid.


NB: When the client is successfully Archived in Xero, the client is removed from the Integration Profile.
When a previously Matched Clients OCFlag is reactivated, the client should be activated again in Xero. Once the client is unarchived in Xero, you can run a refresh from Xero and the client will be relinked and the OCFlag will be reactivated.
ReportThe reports are designed to assist with validating and extracting information about the field matching for Clients.
The following reports are available:
Client Sync Matching Report – Xero
This report will provide a detailed listing of Client matching errors and it will show the values in GreatSoft and Xero. The filters can be changed to show all Clients.Close
This action will close the Xero Integration page and return to the Profile selector page.
Client Grid Actions
As a default, one row is shown per client.

The Client grid row has the following actions (as marked with the blue labels):
Expand / Collapse
This will expand the client row to show the reference number details for a Client.
Mark the Unmatched row for inclusion in the Update to GreatSoft or Update to Xero action – this applies when records are inserted.Alert indicating missing information for the Client.
The row selector is disabled when this alert is shown. The Alert will display for anyone of the following conditions:Client Code
Registration Number
VAT Number
Business Structure
Open the GreatSoft Client Maintenance page.
Open the Xero Client record.
This page provides a log of the actions that are executed and it allows for exception reports to be viewed for a process.

The History grid identifies the following information:
The Process that is executed.
Date of the action.
Username of the person that executed the process.
Record error count.
The following actions are available:
View: This action will print the Xero account Error Log Report.

Xero does not currently allow clients to be restored via their API, to restore a client you need to login to Xero to activate the client.
NB: When the client is successfully Archived in Xero, the client is removed from the Integration Profile.
This report will provide a detailed listing of Client matching errors and it will show the values in GreatSoft and Xero. The filters can be changed to show all Clients.
Source
This page provides access to the source files retrieved for the Refresh from Xero process.

The source files, saved in XML format contain the original information retrieved from Xero when the Refresh from Xero process is executed.
File Name hyperlink: This action will open the file download button allowing the source file to be saved.
Delete: This action will delete the Source row.
Billings integration
To access the billings integration area, click the Integrate button and select Invoices.

Before you proceed
Please ensure that the Allocations, Xero Account List and tax Level Mapping is configured before you proceed with Billing Integration.
Allocations
The allocations in GreatSoft must be matched to Xero Sales Items. This is required when creating invoices via the Xero API. Allocations and Xero Sales Items are matched based on code ONLY.

NB: Limited information is provided for this section as a GreatSoft consultant should guide you through this mapping process to ensure data between GreatSoft and Xero is processed correctly.
Xero Account List
The Xero Account list allows you to retrieve a list of the Xero General Ledger Accounts and pull a report on them in GreatSoft.

Click “Refresh from Xero GL” to initiate a refresh of the General Ledger Accounts from Xero.
Click the “Xero Accounts List Report” to print a list of the XeroAccounts.
Tax Level Mapping
Tax Levels must be matched between GreatSoft and Xero. Tax levels are configured by Office in GreatSoft and are required to be mapped by Office to Xero.

The list of available Tax Levels will be inserted into GreatSoft when the “Refresh Xero Account List” process is run.
To match items, select the Map to Xero drop-down next to the appropriate Tax Level you wish to Match and pick the relevant Tax Level from GreatSoft.

Once Selected, click the Save icon to Match the Rows between GreatSoft and Xero. Once items are mapped and saved the status will update to “Matched” and the “Synced” box will become flagged.

Billings User Interface
Information bar
The date of the Last Sync will be shown in the information bar. This date is the last date entries have been processed to Xero GL.

Tab Sections
Multiple Tab sections are displayed on the page as determined from the Profile Settings.
Invoices: This page will always display and will show information about Invoices and their statuses of
Integration to Xero.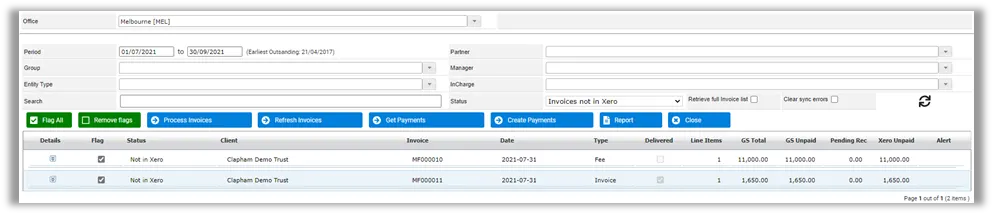
Allocations: This page will show a list of Allocation codes in GreatSoft and their matched Status to Xero GL.

Xero Account List: This page will display a full list of Xero Account codes cached in the GreatSoft application.
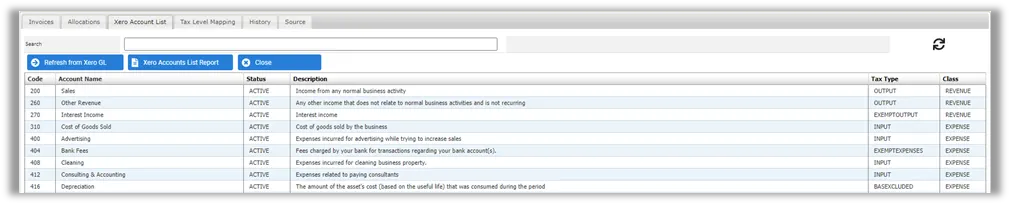
Tax Level Mapping: This page will display the Tax for each office and allow mapping of the Tax in GreatSoft to a Tax level in Xero.

History: This page will always display. It will show an audit trail of the Sync actions initiated together with details of Exceptions.

Source – This page will display a list of documents retrieved by the Integration when the Refresh from Xero Action is successfully initiated.
Further explanations are provided below for each of these sections.


Invoices Tab
The tab is utilized for the Invoice Syncing between GreatSoft and Xero.
Selection Filters
The following filter options are available for the page.
Office – This value will be displayed by default when multiple profiles exist for a particular Integration Type.
Period – This allows a user to filter transactions between a particular date range. The system will default the From date to the earliest transaction date not integrated with Xero.
Group – Use this selector to filter for a particular Family Group.
Entity Type – Use this selector to filter for a particular type of entity if needed.
Partner – Use this selector to filter for a particular Partner.
Manager – Use this selector to filter for a particular Manager.
Incharge – Use this selector to filter for a particular Incharge.
Search – Use the search box to search for part of a client name, code or TFN.
Status– This selector can be used to display clients for one of the following Statuses:
All: Displays a list of Clients that are matched between GreatSoft and Xero. This list also includes Clients not in Xero or Xero clients not in GreatSoft.
Invoices not in Xero
Missing Code or Tax Mapping
Paid
Synced with Xero
Displays a list of Clients that exist in GreatSoft and that can be matched to a client record in Xero.
Client Code VAT/GST Number Client Name | The GreatSoft and Xero Client records will be linked if any one of the following values on the left is matched. All these values can be captured in Xero in the Tax and Company section under Edit Client. |
Unmatched GreatSoft and Xero Changes
Displays a list of Clients that exist in Xero but cannot be matched to a client record in GreatSoft.Unmatched GreatSoft Payments
Displays a list of Clients that exist in GreatSoft but cannot be matched to a client record in Xero.
Page Functions
This page will display the Invoice syncing information. The following button actions are available for Invoices

Flag All: This option will flag rows based on the selected filter settings.
Remove Flags: This option will remove flags from rows based on the selected filter settings.
Process Invoices: This action will push any Invoices Flagged as “Invoices Not in Xero” to Xero based on the filter selections for the area above. Each time the Invoices area is accessed, the latest “Posted” invoices in GreatSoft are brought through into the Integration area.
Refresh Invoices: This action will refresh invoice information from Xero and compare it to existing invoices in GreatSoft for any changes.
Get Payments: This action will refresh invoice information from Xero and compare it to existing invoices in GreatSoft for any changes based on rows that have the status of “Synced with Xero”. This process will run for all invoices with this status and does not require a user to flag rows to process.
Create Payments
This action will retrieve the latest invoice information from Xero. Based on the amount outstanding on the invoice, a receipt will be created in GreatSoft for the difference between the GreatSoft Invoice Unpaid Amount and the Xero Invoice Unpaid Amount. This process will not run for all invoices, a user must select a specific invoice they wish to create receipts for.
Report: This action will trigger the reports available in the Xero Invoice Integration area.
Close: This action will close the Xero Invoice Integration area.
Process Invoices to Xero
New invoices posted will be added to the “Invoices not in Xero” section. To push an invoice to Xero, change your status to “Invoices not in Xero”.

Flag the invoice/invoices you wish to create in Xero. (You can utilize the Flag All button to flag all rows or individually flag rows.)

Click Process Invoices and click Yes when asked to confirm.

The Sync progress will be shown. If no errors are encountered it will show “Complete”.

If any errors are encountered the Status will be “Interrupted” and you will be prompted to check the History tab.

Print the Error Report from the history tab and correct any issues and redo the above process.
Refresh Invoices
Some scenarios may arise where Invoice statuses may become out of alignment between GreatSoft and Xero.

Running the “Refresh Invoices” option will poll Xero and get a list of all the invoices in the Xero system. These invoices are compared, the balances between GreatSoft and Xero to find any changes. This process will then update any statuses which are incorrectly set in the GreatSoft system.
Process Payments from Xero to GreatSoft
Firms who utilize Xero to distribute Invoices and use the Bank Reconciliation feeds will have incoming payments automatically captured in Xero. To get these payments into GreatSoft, the “Get Payments” process needs to be run.

The “Get Payments” only works for Invoices with the status “Synced with Xero”. To retrieve possibly payments from Xero, change the status to “Synced with Xero” and click the “Get Payments” button.

After clicking Yes to confirm, GreatSoft will poll the Xero API to check for changes to invoice balances. Once all invoices balances have been checked, the process will show Complete.

Any Invoices with payments or changes balances will have their status updated to “Unmatched GreatSoft Payments”.
Change the status to “Unmatched GreatSoft Payments”, this will show you the invoices where the balances between GreatSoft and Xero do not agree.

Create Payments
In order to match the balances changing between GreatSoft and Xero, receipts will be created for the difference in the Invoice Unpaid amount between GreatSoft and Xero. Receipts are collated and put into batches per process/per office and will require a user to post the batches created. To create receipts, change the status to “Unmatched GreatSoft Payments”.

Once the status is updated, flag the rows you wish to create payments for (This can be done individually or using the Flag All button)

Click the Crate Payments button to create a receipt batch for the items selected. Click Yes to confirm the process. Once finished the status will show “Complete”.

To review and post the payments, you need to navigate to the Billings / Receipts area of GreatSoft.

The Payments batch created from Xero will be created as “Not Ready”.

Follow the existing Receipts process to review, submit and post the Receipt batch(Note that the existing Receipts approval process and rules will be used even though the receipt is from Xero and may have already been reconciled.) Once completed, the Invoice status will update in the Xero Integration area to “Paid”. You can review the balances which should show the GSUnpaid and Xero Unpaid amounts to be 0.00.

Appendix 1 – Client fields updated between GreatSoft and Xero
Object | Xero Fields | GS client Field | Xero status | GS Status | Update |
|---|---|---|---|---|---|
Client | optional | optional | P | ||
Client | PostalAddres | Address1 (ADPOS) | optional | optional | P |
Client | PostalCity | Town (ADPOS) | optional | optional | P |
Client | PostalRegion | Region (ADPOS) | optional | optional | P |
Client | PostalPostCode | PostCode (ADPOS) | optional | optional | P |
Client | PostalCountry | Country (ADPOS) | optional | optional | P |
Client | Phone | Telephone | optional | optional | P |
Client | WebSite | Website URL | optional | optional | P |
Client | AccountCode | ClientCode | optional | mandatory | P |
Client | IsArchived | ClientOCFlag | optional | mandatory | P |
Client | CompanyNumber | ACN | optional | optional | P |
Client | TAX | VAT Number | optional | optional | P |
Client | BusinessStructure | Type | optional | mandatory | P |
Company | CO – Company | ||||
Individual | IN – Individual | ||||
Partnership | PS – Partnership | ||||
Sole Trader | ST – Sole Trader | ||||
Superannuation Fund | SMSF – Self Managed Superfund | ||||
Trust | TR - Trusts | ||||
For Organisations only | |||||
Client | Name | Name | mandatory | mandatory | P |
Client | Address | Address1 (ADBUS) | optional | optional | P |
Client | City | Town (ADBUS) | optional | optional | P |
Client | Region | Region (ADBUS) | optional | optional | P |
Client | PostCode | PostCode (ADBUS) | optional | optional | P |
Client | Country | Country (ADBUS) | optional | optional | P |
For Individuals only | |||||
Client | Name (Full Name) | Name | Individuals only optional | ignored | |
Client | Address | Address1 (ADPHY) | optional | optional | P |
Client | City | Town (ADPHY) | optional | optional | P |
Client | Region | Region (ADPHY) | optional | optional | P |
Client | PostCode | PostCode (ADPHY) | optional | optional | P |
Appendix 2 – Default Settings to be configured for Client Additions to GreatSoft
The following system options must be configured for each office that is linked to a Xero Integration Profile:
Name | Comment | |
|---|---|---|
1 | Xero GL Default Office | Needed when more than one office is configured. |
2 | Xero GL Default Partner | The Client Partner is mandatory when adding a new client in GreatSoft. The person selected here will be applied for new clients. |
3 | Xero GL Default Manager | The Client Manager is mandatory when adding a new client in GreatSoft. The person selected here will be applied for new clients. |
4 | Xero GL Default In-Charge | The Client Incharge is mandatory when adding a new client in GreatSoft. The person selected here will be applied for new clients. |
6 | CRM Default Group This setting is system-wide and used by various other processes. | The Client Group is mandatory when adding a new client to GreatSoft. |
7 | Enable Invoice Custom Narration Integration | Indicate if Invoice Custom Narration should be integrated instead of Invoice Line Items. This option is only taken into account if the System Option, "eCost / System / Enable Custom Narrations", is set to [Yes]. In addition, the System Option "Global / Integration / Default Invoice Allocation for Custom Narration Integration" must also be configured for each office. |
8 | Default Invoice Allocation for Custom Narration Integration | Indicate the default allocation code to use when integrating Invoice Custom Narrations instead of individual Invoice Line Items. This option is only taken into account if the following System Options are set as follows: - eCost / System / Enable Custom Narrations = "Yes" - Global / Integration / Enable Invoice Custom Narration Integration = "Yes" Select a default Allocation for each office. |
9 | Invoice Due Days for API | -Global / Integration / Invoice Due Days for API Specify the Invoice Due Days per office. This will add the specified amount of days onto the Invoice Date and push it through to Xero as the Due Date. |
This information is used when clients are added to GreatSoft (from Xero) when the Update GreatSoft process is executed.